February 28, 2010
My Favorite Cooking Utensil: Tools of the Trade

It’s long. It is 13 inches long to be exact. That makes it great for using in large pots.
It’s wide. The widest part of the spoon is over 2 1/2 inches. It’s not super wide, but it’s is a nice size and can scoop up a lot of mashed potatoes.
It’s sturdy. The handle is metal and extents into the spoon itself where it fans out and gives support to the spoon.
It’s flexible. The spoon is made of silicone, and while it is strong from the metal, it is also very flexible at the edges. This allows it to be used like a spatula, and is great for scraping the sides of a pot clean.

That’s what I love about my spoon. I bought several other utensils that are the same brand. My second favorite is the ladle. I love it for all the same reasons I listed above. It is a nice big ladle and is also flexible around the edges. I like to use it to dip pancake batter and pour onto the skillet. At the end, I use it to scrape the batter from the sides of the bowl. Of course, it’s perfect for soups too.
I like the slotted spatula the least because it is too fat for getting underneath of things, and the edge of it is not straight. It does get used occasionally, though.
I wish these utensils were a brand I could find online, but since I can’t I recommend looking for something similar in the store. The flexibility is key. I do own a couple of silicone spatulas that are not nearly as flexible, and it is difficult to tell the difference in a picture.
What is your favorite cooking utensil and what do you love about it?
For more Works for Me Wednesday ideas, visit Rocks in My Dryer.
Labels: tools of the trade
February 25, 2010
Pecan Praline Cake

This cake is my new favorite dessert. The recipe is another gluten-free version of a recipe from Mennonite Country-Style Recipes. If you don't eat gluten free, you can use any yellow cake recipe or cake mix and just follow the directions for the praline part of the cake. It’s very easy to make and doesn’t need any frosting. I absolutely love the butter, brown sugar and pecans that rest on top of a soft yellow cake.
I’ve tried this cake several times now trying to perfect a way to keep it from sticking to the pan. I haven’t found a perfect solution, but this worked pretty well. This cake will never win a beauty contest anyway, but it could win awards for being delicious.
Gluten-Free Pecan Praline Cake
Preheat oven to 350 degrees- 1/4 c. butter, melted
- 1 c. brown sugar
- 1 c. chopped pecans
- 1 recipe for yellow cake (for the flour mix I used 1 1/4 c. white rice flour, 1/4 c. tapioca flour, 3/4 c. potato starch)

Toast the pecans by putting them (unchopped) on a cookie sheet or cake pan and baking them about 5 –10 minutes in a 350 degree oven. Keep an eye on them to make sure they don’t burn. This step is optional, but it really brings out the flavor in the pecans. Let them cool a little then chop them.
Melt the butter and combine it with the brown sugar and pecans. Press it onto the bottom of the pan. It will be pretty thin.

Prepare the yellow cake batter and spread it on top of the nut mixture.

Bake at 350 degrees 35 – 40 minutes.

Let it cool in the pan about 5 - 10 minutes. If you have any foil wrapped over the edge of the pan, loosen it up, then turn the cake onto a tray or whatever you plan on serving it on. I have a plastic rectangular cake box that I use, but a cookie sheet will work too. You want the foil and cake to come out of the pan together.

Carefully remove the foil. Have a spatula handy to scrape stuck on pieces off the foil. You might need to do a little patching around the edges. This picture really highlights the patched areas, but viewed from the top it didn’t look that bad.

Just to remind you what the cake look likes:

Enjoy! It’s delicious.
This recipe is linked to the following food carnivals. The links you will find there are not necessarily gluten free, but some are and others can easily be converted.
Labels: cake, dessert recipes
February 23, 2010
What can I eat that’s gluten free?

Welcome to this weekly carnival of gluten-free eating ideas! I hope you will leave a link as well as visit the other links. I can’t wait to see what great ideas everyone has.
Have you been working on this month’s create a gluten-free soup challenge? Next week is the week to link up your soup recipes! I’m sure there will be some good ones. We had several soup recipes linked up last week, so to get you in the mood for next week, I wanted to highlight them. Thanks to everyone for participating!
Cheryl’s Crock Pot Baked Potato Soup Diane’s Beef Brisket Vegetable Soup Chaya’s Green Pea Soup |
My submission this week is another Mexican casserole.
Mexican Casserole
Powered by... Mister Linky's Magical Widgets.
Labels: What can I eat?
February 22, 2010
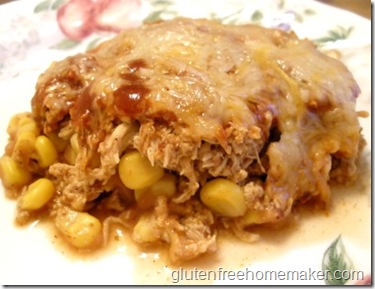
Mexican Casserole #3

Before going out of town the other week, I bought a large pack of chicken breasts. I made one meal, and then realized I wouldn’t be around to use the rest. Instead of just throwing it all in the freezer, I quickly cooked it in my pressure cooker, shredded it in my mixer, divided it into bags, and then stuck in the freezer.
I was glad to have it when I got home. By the time I got back from Nashville, grocery store shelves were pretty bare because of the big snow we had, and more snow was coming. I ended up not buying any meat and depending on what I had in the freezer. This recipe is one way I used the chicken.
Mexican casseroles are easy and fun to make. This one uses several canned products making it a good for days when the frig is rather bare. It’s even easier if you have precooked chicken in the freezer as I did. I realize it can be difficult to find gluten free enchilada sauce, but I happened to have some. If you don’t have any, you could make your own, or try using tomato sauce or salsa. I actually did not use a full package of taco seasoning. If you use a full pack you might not need the spicyness of the enchilada sauce, making tomato sauce a good choice. We don’t like our food very spicy, though.
We all really enjoyed this, and I’m sure I will be making it again before too long.
Gluten-Free Mexican Casserole
- 1 can refried beans
- 1 can sweet corn
- 1/2 can enchilada sauce (or try tomato sauce or salsa)
- 2 c. shredded cooked chicken
- 1 pgk. taco seasoning mix (McCormick)
- shredded cheese

Heat the chicken in a skillet, add the taco seasoning mix and water according to package instructions. Put the chicken over the corn in the dish. Spread about half a can of enchilada sauce over the chicken.

Top with shredded cheese. I used a Mexican blend, but cheddar would be good also. Bake at 350 degrees 20 – 30 minutes until hot through. Let it rest about 10 minutes before eating.

This post is linked to Tasty Tuesday and Tempt My Tummy Tuesday. Stop by to find more great recipes!
Labels: chicken, main dish recipes
February 21, 2010
Easy Menu Planning Tips

Menu planning can be challenging, but it can also be useful. It’s particularly challenging for those who do not like to cook or those who are in a very busy phase of life. It can also be particularly helpful for those folks. One purpose of menu planning is to make meal time easier, but what if menu planning is too big of a chore itself? Here are a few tips I have learned.
1. Choose a meal that everyone loves and assign it to one day of the week. If you think you would get tired of eating it every week, pick two meals and alternate them. You could also choose several meals and have one every week for a month, then switch to the second, and so on. Your favorite meal might also vary by season.
Right now my kids are into baked macaroni and cheese. I decided that Sundays would be the day we have it because they are usually all home for dinner that day. Some weeks, plans change or I decided to do something different. But I always have it as a backup plan.
2. Choose a meal that can be varied and assign it to one day of the week. An example of this is pizza. Most Fridays I make home made gluten-free pizza. Some weeks it has a thick crust, some weeks it’s thin. And then, of course, there are all the different toppings. Pizza can be made a lot of different ways.
In the summer our varied meal might be burgers or tacos.
3. Choose a type of meal and assign it to one day of the week. Examples are casseroles or soups. There are so many kinds of soup that you could eat it every week for months and never have the same soup twice. It helps, though, just to know that Thursday (or whatever day you choose) is soup day. It narrows the decision. Soup is great for using leftovers, and you can even plan the day before to be a meal that will include leftovers that go into soup the next day.
An example would be roasting a chicken, serving it with wild rice which you cook extra of, and then the next night making a chicken and rice soup. You can serve different vegetables with each meal. Roasts are also great for doing that.
If you need inspiration in this area, I have two posts that give basic guidelines for creating your own casserole and creating your own soup.
4. Choose a category of meal and assign it to one day of the week. This is slightly different than tip #3. Examples of categories are vegetarian, seafood, Mexican, or breakfast food. Again, assigning a category to a day narrows your choices and makes the decision easier. You can assign different categories to different days of the week. To keep variety in your menu, try alternating two categories one week, and a different two the next.
Putting it together:
There are a couple of ways to make this type of menu planning work. You can assign a specific meal to each day or just list the general idea for the day, or a combination of both. Of course, any plan is not set in stone. It helps if you can go with the flow and be willing to swap days, or change the plan completely. Below are two menu plan examples.
Menu Plan: Non-specific using the above tips
| Sunday | Favorite meal: Baked macaroni & cheese |
| Monday | Category: Seafood |
| Tuesday | Meal type: Casserole |
| Wednesday | Basic pre-soup meal: Chicken or Roast |
| Thursday | Meal type: Soup |
| Friday | Varied meal: Pizza |
| Saturday | Category: Breakfast food |
Menu Plan: Using tips and assigning specific meals
| Sunday | Favorite meal: Baked macaroni & cheese, veggie tray |
| Monday | Seafood: Scallops with Broccoli & Garlic, rice & quinoa |
| Tuesday | Casserole: Spaghetti Squash Casserole, green beans |
| Wednesday | Pre-soup: Roast beef, potatoes, ratatouille |
| Thursday | Soup: beef & vegetable soup, rolls |
| Friday | Pizza: Medium crust with sausage & mushrooms, salad |
| Saturday | Breakfast food: pancakes, sausage, fruit salad |
There are meals that may not fit into this type of menu plan. If you wish, you could always keep one day open for any type of meal. In the above menu, that might be Wednesday, because some soups would not use leftovers.
Do you have any easy menu planning tips? Please share them in the comments. You can finds lots of menu plans at Menu Plan Monday.
Labels: menu plan
February 18, 2010
Baked Bananas & Banana Cobbler

Baked Bananas

- 5 bananas
- 2 Tb. butter, melted
- 3 Tb. agave nectar
- 1/4 c. orange juice
- 1/2 tsp. cinnamon

Gluten-Free Banana Cobbler
- 3/4 c. sorghum flour
- 1/2 c. white rice flour
- 1/2 c. potato starch
- 1 Tb. baking powder
- 3/4 tsp. xanthan gum
- 1/4 tsp. salt
- 1/2 c. sugar
- 2 large eggs
- 3/4 c. milk
- 1 tsp. vanilla
- 6 – 8 ripe bananas

Peel the ripe bananas and cut them into three pieces, placing the pieces on top of the batter. Drizzle over top:
- 2 Tb. melted butter
- 3 Tb. agave nectar
- 1/4 c. orange juice

This cobbler is low in fat, but it is not dry. However, I loved it eaten warm with milk over top. It’s great by itself, too, and I’m sure it would be even better with ice cream.
Visit Friday Foodie Fix for more recipes that use agave nectar, and Slightly Indulgent Tuesdays for fabulous food made a little bit healthier.
Labels: dessert recipes, fruit desserts
Kitchen Scale Giveaway
 A kitchen scale is a handy item to have around. I’ve used one for years, and was thrilled when I recently won this EatSmart nutrition scale from another blog giveaway. It was better than my old one which only gave me pounds and not ounces. This scale can also be set to grams or kilograms.
I find a scale most useful for dividing up food items that I purchase in bulk. If I buy a big pack of ground beef from BJ’s, I can divide it into one pound packages for freezing. I usually purchase a big bag of shredded cheese or a big block of cheese which I shred in my food processor. I then use my scale to measure out amounts called for in recipes. If you like to follow recipes exactly, it’s great for making sure you are using the right amount of ingredients.
While I don’t use mine this way, food scales are useful if you are dieting and weighing how much you eat. In Europe, people measure flour by weight rather than volume, which they say is more accurate. A kitchen scale can also be used to weigh items you are going to mail.
This scale does not include a bowl, but it has a button for zeroing the scale. Just put any bowl or plate on the scale, zero it, then add the food you are weighing. It’s so simple, and the scale takes up little storage space.
EatSmart is offering their Precision Pro Digital Kitchen Scale to one winner. It also comes with a Guidebook to Calorie Counting. To enter, you must have a U.S. shipping address. Just leave a comment on this post telling me at least one way you would use the scale. Please provide an email address if you do not have a blog where I can reach you. The giveaway will end at 11:00 p.m. eastern time on Monday, February 22nd.
Labels: giveaway
February 16, 2010
What can I eat that’s gluten free?

A belated happy Valentine’s Day to everyone. I do love my readers! I hope you are working on this month’s create a soup challenge. You can link your soup recipe here on March 3rd. If you don’t have a blog, send it to me in an email.
There were lots of great links last week including:
My carnival submission this week is:

Crustless Hamburger Spinach Quiche
Please add your link to any gluten-free recipe, review, or eating idea, and put a link back here in your post. Then head over to some of the other blogs and see what they have to offer this week.
Powered by... Mister Linky's Magical Widgets.
Labels: What can I eat?
February 15, 2010
Crustless Hamburger Spinach Quiche

Crustless quiche is a quick and easy gluten-free meal. It tastes just as delicious without the crust, and it is great for breakfast, lunch or dinner. This recipe is similar to the other crustless quiche recipe I have posted. We liked the addition of spinach to this one. My kids are not spinach fans, but if it is cooked and mixed in with something, they often like it. In fact, my spinach dip is one of their favorite appetizers.
This recipe makes two quiches. If you don’t need that much, cut the recipe in half or freeze one of them.
Gluten-Free Hamburger Spinach Quiche

- 1 lb. ground beef
- 1 small onion
- 1 pkg. frozen chopped spinach
- 1 c. mayonnaise
- 1 c. milk
- 4 eggs
- 2 Tb. cornstarch
- 1/2tsp. salt
- pepper to taste
- 1 c. shredded cheese (cheddar or Swiss is good)
This post is linked to Tasty Tuesday, Tempt My Tummy Tuesday, and Slightly Indulgent Tuesday.
Labels: beef, main dish recipes
February 14, 2010
Gluten-Free Menu Plan
Sunday: Baked Macaroni & Cheese, salad

Monday: Meatloaf, mashed potatoes, broccoli
Tuesday: Heather’s Parmesan tilapia, quinoa, zucchini
Wednesday: Corned beef & ?
Thursday: Soup (probably with cooked chicken I have in the freezer)
Friday: Pizza, salad

Saturday: Breakfast for dinner (maybe Brian’s breakfast casserole)
You can find more menu plans at the weekly carnival Menu Plan Monday.
Labels: menu plan
Traveling Gluten Free

As I have mentioned, I traveled to Nashville last week to attend the blogging conference, Blissdom ‘10. I had a great time, and I’m glad I went, but the whole eating thing wasn’t easy. As far as travel is concerned, it was a new situation for me. In the nine years that I have been gluten free I have traveled in various ways including:
- driving across the country and camping in our pop-up camper, cooking all my meals
- flying to destinations in the US and abroad, then staying with family or friends (this meant I had transportation and a kitchen once I arrived)
- driving to other cities where I stayed in a hotel or condo (driving allowed me to take along plenty of food, go to local grocery stores, and find restaurants where I was comfortable eating )
- I packed two suitcases. At first I thought one would be for clothes and one for food, but that’s not what I ended up doing. I packed a small carryon suitcase with a day’s worth of essential clothes and toiletries, my laptop, and anything else I had room for in order to free up space in my other suitcase for food. I put a few snacks in my purse for the trip.
- In my large suitcase I packed an insulated lunch bag with an ice pack, sliced cheese, baby carrots, celery sticks, zucchini slices, a small container of almond butter, and a small container of jelly. I also included plastic bags for ice once I got to the hotel.
- I packed other food items in plastic bags if there was a chance they could leak or in plastic boxes if they could get crushed. Those items included crackers, bread, homemade granola bars, Lara bars, nuts, dried mango, and fruit cups.
I was supposed to return home on Sunday, but was unable to because of the snow storm that hit Maryland on Saturday. I stayed in Nashville an extra day with Toni of The Happy Housewife. Sunday evening we decided to take a taxi to Outback Steakhouse, and I was able to enjoy another real meal that was gluten free.
The food I traveled with lasted just the right amount of time, even with the extra day. I did get tired of the food, especially the granola bars, but it was gluten-free food I could count on, and that was better than taking risks.
What are your travel tips?
Labels: gluten-free diet, travel
February 12, 2010
What can I eat that’s gluten free? January Review

I like to do a roundup of links for the month to give you a resource with lots of links in one place. Here’s January’s and it is full of great recipes and ideas. If you need gluten-free cooking inspiration, you’re sure to find it here. Thanks to everyone who participated!
January 27 - Baked Meatballs
1. Yadi@gluten free diarieYadi- Orange Rosemary chicken and menu plan
2. Aubree Cherie @ LivingFree (Black Bean Burgers)
3. Shirley @ gfe (Flourless Oatmeal Cookies)
4. Babetta (spicy potato salad)
5. Lisa's Gluten Free Advice (chicken vegetable soup)
6. Mikki-Garden Vegetable Quiche
7. G.@This Girl's Pilgrimage(what I ate yesterday with recipes)
8. Brian (Apple Stuffed Chicken)
9. Liz, The Good Eatah (stuffed acorn squash)
10. Iris at The Daily Dietribe: Vegetarian Soup for the Soul
11. Chaya - Flourless Brownies with Ganache
12. Chaya - Nut Crusted Chicken
13. Fire-Eyes GF Nachos Naturally
January 20 - Chicken & Green Bean Casserole
1. Comfy Cook - Omelet Muffins
2. Chaya - So Silly to Blog This
3. Shirley @ gfe (Reviews of Three Bloggers' Treats)
4. Yadi-gluten free, egg free, soy free, dairy free pancakes
5. Easy To Be Gluten Free (Reuben Casserole)
6. Lauren @ Celiac Teen (Comfort Bowl)
7. Chelsey @ The Crazy Kitchen - Authentic Canadian Chicken Noodle soup
8. Heather (GF Egg Rolls)
9. The W.H.O.L.E. Gang - Mexican Seafood Soup
10. Jenn Cuisine (Chanterelle Omelette with Saucisson Vaudois)
11. Amy @ SS&GF (Protein Packed GF Pancakes!)
12. Amy@lifeminusgluten.com (Mango Basil Stir-fry)
13. Aubree Cherie @ LivingFree (G-Free Chicken Pot Pie)
January 13 - Chicken & Rice Casserole
1. Iris at The Daily Dietribe: Gluten Free restaurant review
2. Lauren @ Celiac Teen (Gluten Free Lemon Cake)
3. Shirley @ gfe (Recycled Food--Croutons)
4. Katrina @ Gluten Free Gidget- Butternut Polenta Lasagna
5. Cheryl-Gewurtztraminer Talapia
6. Brian (GF Vietnamese Meatball Sandwiches)
7. The W.H.O.L.E. Gang - Scallop Pasta with Chorizo Recipe
8. Chelsey @ The Crazy Kitchen - London Fog Tea
9. Amy (sweet potato pecan flapjacks)
10. Amy @ Simply Sugar & Gluten Free (Winter Fruit Compote)
11. Yadi-Lettuce Wraps
12. Easy To Be Gluten Free (Mexican Casserole)
January 6 – Cookie Theme - Snickerdoodles
1. Yadi-Mantecaditos
2. The W.H.O.L.E. Gang-no cookies- Easy Homemade Fresh Chorizo
3. Amy @ Simply Sugar & Gluten Free - Kale, Mushroom, & Quinoa Salad
4. Iris at The Daily Dietribe: Christmas Cookie Roundup
5. Katrina @ Gluten Free Gidget- Ham Bone Soup
6. Brian (GF Chocolate Chip Cookies)
7. Shirley @ gfe (Oven-Steamed Shrimp)
8. Shirley @ gfe (Flourless Peanut Butter Cookies)
9. Alta @ Tasty Eats At Home (GF, SF Oatmeal Raisin Cookies)
10. Lauren @ Celiac Teen (Date Treats)
11. Megan (Scottish shortbread)
Labels: What can I eat?
Bay Scallops with Broccoli

Bay Scallops with Broccoli and Garlic
Use enough scallops and broccoli for your size family and adjust the other ingredients accordingly.- scallops, rinsed and drained (I used 1 1/2 lbs.)
- fresh broccoli, cut
- minced garlic (I used about 1 Tb.)
- olive oil
- butter
Add a little more olive oil and add the broccoli. Stir fry until tender but crisp. Move the broccoli to the edge of the pan and add about 2-3 tablespoons butter in the center. Add the garlic and stir occasionally as it cooks, about 1 minute. Return the scallops to the pan and mix them with the garlic and butter. Stir the broccoli in from the sides of the pan.
I served it over a mix of white rice and red quinoa.
Labels: main dish recipes, seafood
February 10, 2010
A Hand for Haiti

If you’re not already aware, Lauren at Celiac Teen has put together an eBook to raise money for Haiti. All proceeds go to the Canadian Red Cross. The Canadian government is also matching all donations received by February 12th. You can read more about it and purchase the Haiti eBook at Celiac Teen. Donations are made in Canadian dollars. If you’re wondering how that converts, it’s pretty close to the American dollar. A $10 donation (Canadian dollars) will cost you a little less than $10 American dollars.
What can I eat that’s gluten free?
 Welcome to this weekly blog carnival of gluten-free eating ideas. I hope you will join us by adding your link and visiting other links. If you are new to the carnival, please read the guidelines. Most weeks there is no theme for the carnival, but there is the first week of each month.
Last week the theme was “create a casserole” which I challenged everyone to do early in January. I’m thrilled with all the casseroles you guys linked up! Be sure to take a look at the great casserole recipes if you haven’t already.
The first week of next month the theme is soups. Be sure to read this month’s create a gluten-free soup challenge, and get busy making some great soup. Then link your soup recipe here on March 3rd.
My submission this week is:

Quinoa & Millet Pilaf
After you add your link, please take a minute to visit a couple of the other links and leave a comment. I’m sure you’ll find some great ideas.
Powered by... Mister Linky's Magical Widgets.
Labels: What can I eat?
February 9, 2010
Quinoa & Millet Pilaf

Millet has become one of my favorite new foods. You’ve probably noticed that I use millet flour frequently in baked goods. I also like whole millet. It’s a grain just like rice and quinoa and is cooked in the same way. For this recipe I combined equal amounts of quinoa and millet and cooked them together. The millet turned out a little firmer than the quinoa, but it was cooked.
I cook my grains in the pressure cooker, because it is so easy that way. I only need 1 1/2 cup water or broth for 1 cup of grain and I cook it for 5 minutes under high pressure. When using the traditional method to cook them, follow directions on the package. The millet will require a longer cooking time so you could probably put in the total amount of water needed for the quinoa and millet, start the millet cooking, then add the quinoa about half way through.
If you’re wondering about the delicious looking fish in the photo, that is Heather’s Parmesan tilapia recipe.
Gluten-Free Quinoa & Millet Pilaf
- 1/2 c. red quinoa
- 1/2 c. millet(or substitute rice or use all quinoa)
- 1 onion, chopped
- 3 small zucchini, diced (about 3 cups)
- 3 Tb. butter or olive oil
- 1 Tb. dried parsley
- 1 clove garlic, minced
- salt & pepper to taste
Gently mix together the quinoa, millet and vegetables. Check the amount and salt & pepper and add more if needed.
This post is linked to Slightly Indulgent Tuesday, Tasty Tuesday, and Tempt My Tummy Tuesday.
Labels: vegetables and side dishes
February 7, 2010
Giveaway Winners
Congratulations to the following bloggers who won my two most recent giveaways.
Mixes from the Heartland: Michelle from Big Blueberry Eyes
iHerb: Stephanie from No Grain, No Pain
Labels: giveaway
Gluten-Free Cinnamon Pear Muffins

For those on a gluten-free diet, breakfast can be a challenge. It can be a challenge to anyone for that matter, especially if you want to make it healthy and economical. Muffins are an easy grab-and-go breakfast. If you make them yourself, you can save money and ensure that they are healthy.
Thankfully, gluten-free muffins are pretty easy to make. I like to include as much whole grain flour and as little starch as possible. For this recipe I also decided to use agave nectar as a sweetener. Agave is not calorie free, but it does not affect blood sugar levels like sugar does. That makes it a particularly good choice for starting the day. If you don’t have agave, I’ve included instructions for using sugar.
I’ve been working on this recipe for a while. My first tries resulted in a good, but slightly dry muffin. They were good fresh, but I like to make muffins at night to have for breakfast the next morning. In order to make them moist enough the next day, I increased the amount of milk. That makes them a bit heavier so they don’t rise as much. If you are going to eat while they are still warm, you might want to cut the milk back to 2/3 cup but keep an eye on them. 15 minutes of baking might be enough.
Gluten-Free Cinnamon Muffins

Ingredients
- 1/2 c. sorghum flour
- 1/2 c. brown rice flour
- 1/2 c. millet flour
- 1/2 c. tapioca starch
- 1/2 tsp. xanthan gum
- 1 Tb. baking powder
- 1 tsp. unflavored gelatin
- 1/4 tsp. salt
- 1 tsp. cinnamon (or more if you want a strong flavor)
- 3/4 c. milk or substitute
- 1/3 c. agave nectar
*
- 2 eggs
- 1/4 c. oil or melted butter
- 1 tsp. vanilla
- 1 ripe pear
Combine the dry ingredients in a large mixing bowl. In a smaller bowl, combine the milk, eggs, oil, vanilla, and agave. Wash, core, and chop the pear, leaving the peel on. Cut it into pretty small pieces, they can seem pretty large when in a muffin. Add the wet ingredients to the dry ingredients and stir, making sure all the dry ingredients are incorporated. Stir in the pear.
Spoon the batter into 12 greased muffin cups. Bake at 400 degrees for 15 minutes. Remove from the pan and cool on a wire rack (or while still warm, but not hot).
*If you don’t have agave nectar, use 1/3 c. sugar and add it to the dry ingredients. Increase the milk by 1/4 c. I haven’t actually tried it that way, so add half the additional milk first, then the rest if needed.
View Printable Recipe
Labels: bread recipes, breakfast recipes
February 5, 2010
Create a Gluten-Free Soup Challenge

Since Iris and Shirley both encouraged me to continue with a monthly challenge, I think I will. I wanted to do a muffin challenge this month, but I need more time to come up with a basic recipe as a guideline. I realize we just had a soup theme in November, but February is a great time to work on creating soups. It’s so easy too!
The challenge this month is to create at least one soup, then come here and link to the recipe (or at least what you did) on March 3rd. You can start with a recipe if you want to give you basic amounts of ingredients, but get creative. Soups are great for using up things you have on hand in your pantry or freezer, or for using leftovers. You could also plan a soup with ingredients that your family enjoys. At the end of this post are links to some of the soup recipes I have already posted. Take a look if you need more inspiration.
I cook almost all my soups in my pressure cooker, but a slow cooker as well as the stove top are also good choices. For that reason, I won’t give any cooking directions here. Basically you want to make sure all your ingredients are cooked to desired doneness. In the pressure cooker, I have to cook some vegetables whole because they get done so quickly. In the crock pot, however, I sometimes precook veggies such as onions because they don’t get done as quickly. Also, you might choose to use some ingredients that are already cooked. Rice for example can be added raw and cook in the soup liquid, or you can use leftover rice and add it towards the end.
Here are suggestions for different types of ingredients you can use. I am not giving amounts because it all depends on how much soup you want to make and how much of each particular ingredient you want to use.
Soups are pretty hard to ruin. The two main problems I can think of are mushy veggies and lack of flavor. As for the veggies, you just have to be careful not to overcook them. As for flavor, make sure you taste it before you serve it, and add more seasoning of needed. If necessary, put a spice blend on the table for people to add to the soup if they want. One of my sons puts Old Bay seasoning on almost everything.
This list contains suggestions to get you going. The possibilities are endless.
Liquid
- water
- chicken broth
- beef broth
- vegetable broth
- seafood broth
- milk
- cream
- milk substitute
- any meat, poultry, or seafood cut in bite size pieces
- beans, canned or precooked
- cheese, usually added at the end
- whole grains such as quinoa add some protein
- potatoes
- rice
- pasta
- quinoa
- millet
- corn
- other grain?
- green beans
- broccoli
- carrots
- celery
- zucchini
- onions
- peas
- leeks
- tomatoes
- salt & pepper
- basil
- oregano
- curry
- cumin
- Old Bay
- garlic

Hamburger Soup

Potato Chowder

Creamy Vegetable Soup
Labels: monthly challenge, soup recipes
February 4, 2010
Namaste Foods: Gluten-Free Mixes and More
Now what does the blogging conference have to do with Namaste Foods? They are helping to sponsor my trip! Namaste specializes in delicious foods free of: gluten, wheat, potato, soy, corn, dairy, tree nuts, peanuts, and casein. They also have some sugar-free products. Take a look at their products page. They offer mostly baking mixes, but they also have some pasta meals.
Namaste sent me a free bag of their perfect flour blend. It contains sweet brown rice flour, tapioca flour, arrowroot flour, sorghum flour, and xanthan gum. I tried the recipe on the back of the flour mix package for Mom’s Molasses Bars, and we were in love. Before going gluten free, molasses cookies were my favorite cookies to bake. I’ve never come up with a good gluten-free version of the cookies (though I haven’t really tried in a while). The molasses bars were soft, moist, and delicious, and they hit that molasses cookie spot.

I also tried their recipe for oatmeal cookies. I omitted the raisins just because I’m not a raisin fan, and I increased the amount of nuts slightly just because I am a nut fan. I hadn’t made oatmeal cookies in a while, and these really hit the spot too.

You can buy Namaste products from their site, or you might find them at your local health food store. Thanks Namaste!
Labels: reviews
![]()
Subscribe to Posts [Atom]
