January 24, 2011
Cranberry Walnut Muffins

Muffins are wonderful. Don’t you think so? They are a nice serving size and work perfectly for an easy snack or breakfast. They can satisfy that desire for something bready, and they are so very versatile. You can vary the flours and the add-in options are numerous. Try a variety of nuts, fresh, canned, dried, or frozen fruit, chocolate or other sweet “chip”, coconut, or seeds. You can do all kinds of things with muffins!
As much as I love them, I hadn’t made any in a while. I guess I became too busy with holiday baking, and as a result muffins were neglected and almost forgotten. Almost. Who could forget them? When I did remember, I decided I needed to create a new muffin recipe I could share with all of you. It had been a while since I posted a muffin recipe, and I was in the mood to try something new.
As usual, I made a double batch of these. I often intend to freeze some, and while that does happen at times, more often than not, all the muffins get eaten in a few days. That was the case with these. We enjoyed them and I bet you will too.

Gluten-Free Cranberry Walnut Muffins
Preheat oven to 400°- 1/2 c. sorghum flour
- 1/2 c. brown rice flour
- 1/2 c. sweet rice flour
- 1/2 c. + 2Tb. potato starch
- 1/4 c. tapioca starch
- 1 tsp. xanthan gum
- 1 Tb. baking powder
- 1 tsp. baking soda
- 3/4 tsp. salt
- 1 tsp. unflavored gelatin (optional)
- 1/2 c. sugar
- 1/4 c. melted coconut oil (or cooking oil of choice)
- 1 c. milk or milk substitute (I used Almond Breeze original)
- 1 tsp. vanilla extract
- 2 large eggs
- 1/2 c. chopped toasted walnuts
- 1/2 c. dried cranberries
Soon into a greased muffin tin. Bake at 400° for 18 – 20 minutes. Let cool in the pan for several minutes then remove to a wire rack.

View Printable Recipe
This recipe is part of Slightly Indulgent Tuesdays.
Labels: bread recipes, breakfast recipes

January 17, 2011
Gluten-Free Biscuits

There is something about cut-out biscuits that I prefer to drop biscuits. I guess it’s the fact that they are more uniform. I like a neat round disk better than a lump or mound, and for that reason I’ve longed for a gluten-free cut-out biscuit. I finally made one that I like.
Over the years, I’ve tried a number of different biscuit recipes, both drop and cut-out. Since gluten-free bread dough of any kind is usually wetter than it’s gluten containing counterpart, drop biscuits just worked better. My mistake in trying cut-out biscuits was thinking that the dough needed to be dry enough to be rolled with a rolling pin. It always produced heavy and sometimes hard biscuits.
What I learned with my recent experiments is that you can keep the dough pretty wet and gently pat it out. The trick is to give it enough liquid to keep the finished product light, but not so much that you can’t handle the dough. This recipe worked beautifully for me and I hope it does for you too.

I made this recipe dairy free but have listed the dairy ingredients first. Just keep in mind that I did not actually try it with real butter and milk. I gave up on the idea of making a buttermilk biscuit because adding vinegar to almond milk to make a sour milk has never produced good results for me. The milk curdles and separates so that I end up with a rather clear liquid on the bottom and white stuff floating on top. Instead, I use cream of tartar in this recipe to provided the acid needed for the baking soda. There is also an ample amount of baking powder to help this dough rise.

Gluten-Free Cut-Out Biscuits
Preheat oven to 400°- 1 c. brown rice flour
- 1 c. potato starch + extra for working with the dough
- 1 tsp. xanthan gum
- 1 Tb. baking powder
- 1 tsp. cream of tartar
- 3/4 tsp. baking soda
- 3/4 tsp. salt
- 1 Tb. sugar
- 1/4 c. butter (I used Earth Balance vegan buttery sticks)
- 1 large egg
- 3/4 c. milk (I used Almond Breeze almond milk)
In a medium bowl combine the dry ingredients. Cut the butter in chunks and work it into the dry ingredients with a pastry blender.

Lightly beat the egg into the milk. Add the wet ingredients to the dry and stir gently with a fork. Scrape the sides of the bowl with a spatula and make sure all the flour is incorporated, but to not over stir.
Place the dough on your prepared work surface that. Put your hand inside a plastic baggie and gently pat the dough into a circle about 7-8 inches in diameter, depending on how tall you want your biscuits. They will not rise much in the oven.

Dip your biscuit cutter into potato starch then cut straight down through the dough. When you pick up the cutter, the biscuit will probably be stuck inside, but will slip out easily onto your baking sheet. Dip the cutter in potato starch between each biscuit. Combine dough scraps to make additional biscuits.
Bake for about 15 minutes, depending on size.
My biscuit cutter is a little less than 3 inches in diameter. My biscuits were about 1 inch high. The recipe yielded 8 biscuits plus one small one made from scraps.
View Printable Recipe
I hope you all will join me for this month's biscuit challenge.
This post is part of Slightly Indulgent Tuesdays.
Labels: bread recipes
October 22, 2010
Butternut Squash Bread
This delicious recipe is serving two blogging purposes. It is my entry for October’s create a gluten-free quick bread challenge. and it is my entry for this month’s Go Ahead Honey, It’s Gluten-Free. I love Diane’s scared silly theme. She is asking us to write about foods we were once afraid to cook, but now realize that it’s silly. Squash is one of those foods for me. I was afraid of squashes. I was afraid I wouldn’t like them and afraid I couldn’t cook them. I now realize I was wrong on both counts, and it was silly of me to think that way.
 I will admit that I have had squash in the past and more recently that I didn’t like. I don’t know if it was the particular squash or just the way it was prepared. However, since I started cooking squash in the past couple of years, most of what I’ve made has been very tasty and did not have that nasty squashy flavor that I always associated with it.
I’ve also learned that squash is very easy to cook. If you don’t want to deal with cutting a hard squash, just roast it whole. If you are able to cut it in half, that will speed up the cooking time. Some are not so hard to cut and can be peeled and steamed like in this recipe. I’ve also cooked squash in my pressure cooker.
For this month’s quick bread loaf challenge I thought of making a pumpkin bread, since I don’t yet have a recipe for that on my blog. However, I wanted to do something a little less common, and so I used butternut squash puree instead of pumpkin. I haven’t tried this recipe with pumpkin, but I bet it would work just as well. This bread rose well, it was soft and moist, but not too moist. It tasted much like pumpkin bread, but the butternut squash has a gentle flavor of its own. My family loved it, and it was gone in no time.

Wet Ingredients:
In the bowl of your mixer, combine the wet ingredients. In a separate bowl, combine the dry ingredients except for the nuts. Add the dry ingredients to the wet and mix just until moistened. Stir in the nuts. Pour the batter into the loaf pans and bake at 350° for 50 – 60 minutes or until a tester comes out clean.
Let cool for 5 minutes in the pan, then transfer to a wire rack to cool completely. Makes two loaves.
Note: I'm sure other add ins would be good in this recipe. Try raisins, dried cranberries, or chocolate chips. You could also vary the spices and try nutmeg, cardamom, or allspice.
View Printable Recipe
For more great recipes (though not necessarily gluten free) check out Slightly Indulgent Tuesdays.
 I will admit that I have had squash in the past and more recently that I didn’t like. I don’t know if it was the particular squash or just the way it was prepared. However, since I started cooking squash in the past couple of years, most of what I’ve made has been very tasty and did not have that nasty squashy flavor that I always associated with it.
I’ve also learned that squash is very easy to cook. If you don’t want to deal with cutting a hard squash, just roast it whole. If you are able to cut it in half, that will speed up the cooking time. Some are not so hard to cut and can be peeled and steamed like in this recipe. I’ve also cooked squash in my pressure cooker.
For this month’s quick bread loaf challenge I thought of making a pumpkin bread, since I don’t yet have a recipe for that on my blog. However, I wanted to do something a little less common, and so I used butternut squash puree instead of pumpkin. I haven’t tried this recipe with pumpkin, but I bet it would work just as well. This bread rose well, it was soft and moist, but not too moist. It tasted much like pumpkin bread, but the butternut squash has a gentle flavor of its own. My family loved it, and it was gone in no time.

Butternut Squash Bread
Preheat oven to 350°. Grease two 9 x 5 inch loaf pans.Wet Ingredients:
- 2 c. butternut squash puree (1 med. squash)
- 1 c. granulated sugar
- 1 c. light brown sugar
- 4 large eggs
- 2/3 c. melted coconut oil (or vegetable oil)
- 2/3 c. water

- 1 1/4 c. sorghum flour
- 1 c. millet flour
- 3/4 c. potato starch
- 1/2 c. tapioca starch
- 2 tsp. baking soda
- 1/2 tsp. baking powder
- 2 tsp. xanthan gum
- 1 tsp. salt
- 2 tsp. cinnamon
- 1/2 tsp. ground nutmeg
- 1/2 tsp. ground ginger
- 1 c. chopped toasted pecans or walnuts
In the bowl of your mixer, combine the wet ingredients. In a separate bowl, combine the dry ingredients except for the nuts. Add the dry ingredients to the wet and mix just until moistened. Stir in the nuts. Pour the batter into the loaf pans and bake at 350° for 50 – 60 minutes or until a tester comes out clean.
Let cool for 5 minutes in the pan, then transfer to a wire rack to cool completely. Makes two loaves.
Note: I'm sure other add ins would be good in this recipe. Try raisins, dried cranberries, or chocolate chips. You could also vary the spices and try nutmeg, cardamom, or allspice.
View Printable Recipe
For more great recipes (though not necessarily gluten free) check out Slightly Indulgent Tuesdays.
Labels: bread recipes, Go Ahead Honey
September 27, 2010
Butternut Squash Pancakes

There’s not much time left for this month’s create a gluten-free pancake or waffle challenge. Of course, I hope you keep working on creating great gluten-free food even after each challenge ends. My goal for the month was to make one new waffle recipe (multigrain waffles) and one new pancake recipe. I have been wanting to make a pancake with some type of fruit or vegetable added, and since I had lots of butternut squash from my CSA box, I decided on that.
Now I fully expected these pancakes to be good, but I didn’t expect to take my first bite and think, “This tastes like pumpkin bread!” It really does. So if you like pumpkin bread, you will like these pancakes. If you like other spices in addition to cinnamon in your pumpkin bread, I’m sure they would be tasty in this recipe too. I can’t handle much nutmeg, but I think next time I will try a little ginger.
I have added brown sugar to this pancake batter making it sweet enough to eat on it’s own. If you really want to add syrup to your cakes, omit or cut back the amount of sugar. We liked them like this, and the leftovers stayed moist for a couple of days. Since they don’t need any sticky stuff on them, these would be great for an on-the-go breakfast or packed lunch.

Gluten-Free Butternut Squash Pancakes
- 2 c. cubed butternut squash
- 1/3 c. brown sugar
- 2 large eggs
- 1/2 c. millet flour
- 1/2 c. potato starch
- 1/2 tsp. baking soda
- 1/2 tsp. baking powder
- 1 tsp. cinnamon
- oil for skillet
Remove the squash to a medium size bowl. Mash with a hand masher. Add the brown sugar to the squash and stir until the sugar is dissolved. Add the eggs and beat them into the squash with a fork.
In a small bowl, combine the millet flour, potato starch, baking soda, baking powder, and cinnamon, whisking them together. Add this to the squash mixture and stir with a large spoon or spatula until all the dry ingredients are moistened. Let sit while you preheat your skillet.

Use a little oil (about 1 Tb.) to coat the bottom of your skillet. Heat it until a drop of pancake batter sizzles on it. Spoon or ladle the batter onto the skillet. Cook until bubbles form on the tops of the pancakes, then turn them over and cook for a minute or two more, watching to make sure they don’t burn.
Makes about 10 pancakes.
View Printable Recipe

This post is linked to Slightly Indulgent Tuesdays at Simply Sugar & Gluten Free.
Labels: bread recipes, breakfast recipes
September 19, 2010
Gluten Free, Dairy Free, Soy Free
I think I mentioned recently that I’m back to eating dairy free. I’m also mostly soy free. The reason for these additional diet restrictions is related to my thyroid problems. I will probably write a post about that at a later date after I’ve seen what effect it has.
It’s been hot since these diet changes, and so I’m just now getting around to trying my hand a baking. I thought it would be a good time to remind you that many recipes can easily be made dairy free and soy free by substituting. Soy is often used in dairy substitutes, so it can be a bit challenging. I have been using Spectrum organic palm oil shortening which is not hydrogenated. I found a soy free version of Earth Balance spread, but not the sticks, so I haven’t tried that.
I recently made my favorite gluten-free chocolate chip cookies using the Spectrum shortening and Ghirardelli chocolate chips which are dairy free but contain soy lecithin. I didn’t change anything about the recipe except to replace the butter with shortening. They turned out great!

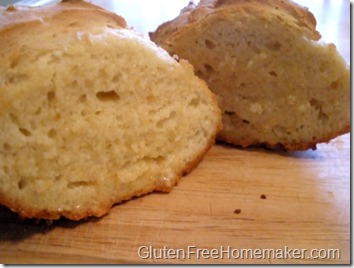
A few of my favorite bread recipes are naturally dairy free including my wonderful French bread which I made the other night for dinner. I used millet flour in place of sorghum and loved the bread even more than before. How I wish I had taken a picture of it. It rose so nicely, and my husband said, “This is just like regular bread.” Here’s a picture of the bread made with sorghum:
I also like making that recipe as French bread rolls, but with more whole grain and less starch. This version uses sorghum and millet.

Then there’s my favorite focaccia bread and hamburger buns recipe that uses olive oil and water.
![hamburberbun_thumb8[1]](https://blogger.googleusercontent.com/img/b/R29vZ2xl/AVvXsEhdbSKKKwlLLUhrHBzhZyVu-QtB0s4qfjfzYshpD9kp3Ataq7j_BkZEqzgMB2HO7Mq-vGcI_01LEQaQa0Z2_OYbF2SrVDx8vVZmw2p2C3Q40g1u8j-1-uble1AkSqDeWhapJ67pBwzgkVBz/?imgmax=800 "hamburberbun_thumb8[1]")
If you haven’t tried these recipes, yet, all of them are favorites in this house. I think you will enjoy them, and there is no need to apologize for the fact that they are gluten free, dairy free, and soy free.
It’s been hot since these diet changes, and so I’m just now getting around to trying my hand a baking. I thought it would be a good time to remind you that many recipes can easily be made dairy free and soy free by substituting. Soy is often used in dairy substitutes, so it can be a bit challenging. I have been using Spectrum organic palm oil shortening which is not hydrogenated. I found a soy free version of Earth Balance spread, but not the sticks, so I haven’t tried that.
I recently made my favorite gluten-free chocolate chip cookies using the Spectrum shortening and Ghirardelli chocolate chips which are dairy free but contain soy lecithin. I didn’t change anything about the recipe except to replace the butter with shortening. They turned out great!

A few of my favorite bread recipes are naturally dairy free including my wonderful French bread which I made the other night for dinner. I used millet flour in place of sorghum and loved the bread even more than before. How I wish I had taken a picture of it. It rose so nicely, and my husband said, “This is just like regular bread.” Here’s a picture of the bread made with sorghum:

I also like making that recipe as French bread rolls, but with more whole grain and less starch. This version uses sorghum and millet.

Then there’s my favorite focaccia bread and hamburger buns recipe that uses olive oil and water.
![hamburberbun_thumb8[1]](https://blogger.googleusercontent.com/img/b/R29vZ2xl/AVvXsEjLWU3VUc9fBfWjQYUda4MKcETt9BK9oUePk4PCosIkWpuRLp6Kqw23Ew21hKSvUkU2MKR3lbR5Rg9eCvNpRGHn8jQOk7atTtsIi5JP4F0_orqTFMdAQ9uDT7-RZXirTBN5XegiDagTaRaN/s1600-h/hamburberbun_thumb8%5B1%5D%5B4%5D.png "hamburberbun_thumb8[1]")
If you haven’t tried these recipes, yet, all of them are favorites in this house. I think you will enjoy them, and there is no need to apologize for the fact that they are gluten free, dairy free, and soy free.
Labels: bread recipes, dairy free, dessert recipes
July 6, 2010
Zucchini Bread
 (without walnuts)
With an abundance of zucchini in my garden, I naturally think of making zucchini bread or muffins. However, when the temperature outdoors is well into the 90s and maybe even over 100, I am not willing to turn on my oven. Last week I got lucky though, and we had a reprieve from the heat. A couple of days were in the 70s with cool morning temperatures. I got busy baking and made four loaves of zucchini bread as well as two bundt cakes. I used Brenna’s zucchini bread recipe for the cake and baked it in a bundt pan. The recipe includes banana and chocolate and turns out deliciously moist. We ate it without any frosting or glaze.

This zucchini bread is slightly more dry and crumbly than the cake, but not too much. It goes well with a glass of milk (I’m loving Almond Breeze milk) or a scoop of ice cream.
Gluten-Free Zucchini Bread (dairy free)
Preheat oven to 375°- 4 large eggs
- 1 c. sugar
- 2/3 c. oil
- 1/2 c. apple sauce
- 2 tsp. vanilla
- 2 c. shredded zucchini, packed (~1 large)
- 1 c. brown rice flour
- 1 c. sorghum flour
- 2/3 c. potato starch
- 1/3 c. tapioca starch
- 2 tsp. xanthan gum
- 1 Tb. cinnamon
- 1 tsp. salt
- 1 1/2 tsp. baking soda
- 1 1/2 tsp. baking powder
- 1 c. walnuts, chopped (optional)
View Printable Recipe (1 loaf)
View Printable Recipe (2 loaves)

This post is part of Slightly Indulgent Tuesdays at Simply Sugar & Gluten Free.
Labels: bread recipes
April 5, 2010
Chocolate Coconut Muffins

I decided to come up with one more muffin recipe last month, and I’m so glad I did. We really enjoyed these. I started with the basic recipe I provided in the challenge. I wrote down what I wanted to do, but I made changes as I went. For example, I started with a flour combination that included corn flour, however, I decided chocolate muffins would be fun and replaced the corn flour with cocoa powder. Then, just before I measured the oil I thought, “I’d rather use coconut oil.” I decided coconut and chocolate would go well together so I used the coconut oil and added shredded coconut to the recipe.
I also decided to include ground flax seed in this recipe to make it healthier, and you would never know it’s there. I’ve been tending toward less moist muffins these days which doesn’t mean they are dry, they are just not what I would call moist. We ate them warm without anything on them. I made them at night, and the next morning they definitely needed a little time in the microwave to soften them up, but that did the trick.
Gluten-Free Chocolate Coconut Muffins

- 3/4 c. sorghum flour
- 1/2 c. millet flour
- 1/2 c. potato starch
- 1/4 c. cocoa powder
- 2 Tb. ground flax seed
- 1 tsp. xanthan gum
- 1 tsp. unflavored gelatin
- 1 Tb. baking powder
- 3/4 tsp. salt
- 1/3 – 1/2 c. sugar (I used 3/4 c. in a double recipe)
- 2 eggs
- 1 tsp. vanilla
- 1 c. milk (or substitute)
- 1/4 c. coconut oil, melted
- 1/2 c. shredded coconut (I used organic, unsweetened)
- 1/2 c. walnuts, toasted & chopped (optional)
View Printable Recipe
For more fabulous food made a little bit healthier, visit Slightly Indulgent Tuesdays.
Labels: bread recipes, breakfast recipes
March 29, 2010
Multi-Grain Carrot Walnut Muffins

I’m a few days late, but this is my entry for this month’s Go Ahead Honey, It’s Gluten Free which is being hosted at Simply Sugar and Gluten Free, and has a theme of guiltless pleasures. These muffins fit the bill for me. I just enjoy muffins. They are a nice size and they are good for breakfast or snacking. I made these guiltless by including whole grains, nuts, and carrots.
These muffins will also be my submission next week for my monthly challenge which is to create a gluten free muffin.
Buckwheat flour in these muffins give them a hearty whole grain flavor. I love it combined with the carrot and walnuts. These are not moist muffins, but neither are they overly dry. Muffins by nature are on the dry side, like a cake that you eat with ice cream. You can spread these with a little butter or jam if you like. You could also try adding some applesauce to the recipe, but I like them the way they are.
The list of ingredients is rather long, partly because it uses five different flours/starches. If you don’t have all the flours used, try substituting what you do have. Just substitute a whole grain for a whole grain and a starch for a starch.
Gluten-Free Multi-Grain Carrot Walnut Muffins

Preheat oven to 375 degrees
- 3/4 c. millet flour
- 1/4 c. brown rice flour
- 1/4 c. buckwheat flour
- 1/2 c. potato starch
- 1/4 c. tapioca starch
- 1 tsp. xanthan gum
- 1 Tb. baking powder
- 3/4 tsp. salt
- 1 tsp. unflavored gelatin
- 1/3 c. sugar
- 2 eggs
- 1 tsp. vanilla
- 3/4 c. milk
- 1/3 c. oil
- 1/2 c. shredded carrots, packed
- 1/2 c. chopped toasted walnuts
Spoon batter into a muffin tin and bake at 375 degrees for 18- 20 minutes. Remove to a wire rack and cool.
View Printable Recipe
Labels: bread recipes, breakfast recipes
March 22, 2010
Chocolate Chip Nut Muffins

March is going by quickly. I hope you all are working on a muffin recipe to link to for Gluten-Free Wednesday on April 7. If you’re new here, please read about my create a gluten-free muffin challenge.
Keeping with that theme, I have another muffin recipe for you this week. The recipe uses sorghum flour, brown rice flour, and potato starch. I like using whole grain flours in muffins to increase their nutritional value. The walnuts add protein and good fat, while the chocolate chips are just for flavor and fun. If you want a sweet muffin, increase the amount of sugar. I add just enough that no one complains, but not enough to make them taste like cake. My family enjoyed these, and I hope you do too.
Gluten-Free Chocolate Chip Nut Muffins

Preheat oven to 375 degrees
- 3/4 c. sorghum flour
- 1/2 c. brown rice flour
- 3/4 c. potato starch
- 1 tsp. xanthan gum
- 1 Tb. baking powder
- 3/4 tsp. salt
- 1/3 c. sugar
- 1/3 c. oil
- 2 eggs
- 1 tsp. vanilla extract
- 1 c. milk
- 1/2 c. walnuts, toasted & chopped
- 1/2 c. chocolate chips


View Printable Recipe
For more great recipes visit Slightly Indulgent Tuesdays.
Labels: bread recipes, breakfast recipes
March 8, 2010
Pineapple Coconut Muffins

This week I wanted to give you a little inspiration for March’s create a gluten-free muffin challenge. These muffins were a hit with my whole family, and I bet you’ll like them too. Feel free to try a different flour combination, but remember your results will vary a little.
Gluten-Free Pineapple Coconut Muffins

Preheat oven to 375 degrees.
- 3/4 c. sorghum flour
- 1/2 c. millet flour
- 3/4 c. potato starch
- 1 tsp. xanthan gum
- 1 Tb. baking powder
- 3/4 tsp. salt
- 1/3 c. sugar
- 1/4 c. oil
- 2 large eggs
- 1 tsp. lemon extract (vanilla would be fine)
- 3/4 c. pineapple juice
- 1/2 c. canned crushed pineapple
- 1/2 c. coconut (I use sweetened)

In a mixing bowl, combine the dry ingredients. In a smaller bowl, or measuring cup, combine the egg, lemon extract, and pineapple juice. Add the wet ingredients to the dry ingredients and whisk together until moistened. Stir in the pineapple and coconut.
Bake at 375 degrees for 20 – 25 minutes. Let the muffins cool in the pan for about 5 minutes, then transfer to a wire rack. Serve warm.
Note: A teaspoon of lemon zest would be a great addition to this recipe.
View Printable Recipe
This recipe is linked to Slightly Indulgent Tuesdays at Simply Sugar & Gluten Free.
Labels: bread recipes, breakfast recipes
February 7, 2010
Gluten-Free Cinnamon Pear Muffins

For those on a gluten-free diet, breakfast can be a challenge. It can be a challenge to anyone for that matter, especially if you want to make it healthy and economical. Muffins are an easy grab-and-go breakfast. If you make them yourself, you can save money and ensure that they are healthy.
Thankfully, gluten-free muffins are pretty easy to make. I like to include as much whole grain flour and as little starch as possible. For this recipe I also decided to use agave nectar as a sweetener. Agave is not calorie free, but it does not affect blood sugar levels like sugar does. That makes it a particularly good choice for starting the day. If you don’t have agave, I’ve included instructions for using sugar.
I’ve been working on this recipe for a while. My first tries resulted in a good, but slightly dry muffin. They were good fresh, but I like to make muffins at night to have for breakfast the next morning. In order to make them moist enough the next day, I increased the amount of milk. That makes them a bit heavier so they don’t rise as much. If you are going to eat while they are still warm, you might want to cut the milk back to 2/3 cup but keep an eye on them. 15 minutes of baking might be enough.
Gluten-Free Cinnamon Muffins

Ingredients
- 1/2 c. sorghum flour
- 1/2 c. brown rice flour
- 1/2 c. millet flour
- 1/2 c. tapioca starch
- 1/2 tsp. xanthan gum
- 1 Tb. baking powder
- 1 tsp. unflavored gelatin
- 1/4 tsp. salt
- 1 tsp. cinnamon (or more if you want a strong flavor)
- 3/4 c. milk or substitute
- 1/3 c. agave nectar
*
- 2 eggs
- 1/4 c. oil or melted butter
- 1 tsp. vanilla
- 1 ripe pear


Combine the dry ingredients in a large mixing bowl. In a smaller bowl, combine the milk, eggs, oil, vanilla, and agave. Wash, core, and chop the pear, leaving the peel on. Cut it into pretty small pieces, they can seem pretty large when in a muffin. Add the wet ingredients to the dry ingredients and stir, making sure all the dry ingredients are incorporated. Stir in the pear.
Spoon the batter into 12 greased muffin cups. Bake at 400 degrees for 15 minutes. Remove from the pan and cool on a wire rack (or while still warm, but not hot).
*If you don’t have agave nectar, use 1/3 c. sugar and add it to the dry ingredients. Increase the milk by 1/4 c. I haven’t actually tried it that way, so add half the additional milk first, then the rest if needed.
View Printable Recipe
Labels: bread recipes, breakfast recipes
January 1, 2010
Whole Grain Cinnamon Roll Update

Not long ago I gave you a recipe for gluten-free cinnamon rolls that used more whole grain than my original recipe. They were very good, but for my family, they were not as good as my previous version and therefore not their choice for Christmas morning.
In November, I tried the recipe again but divided the amount of sorghum I had used in half and replaced the other half with millet flour. The results were terrific. I was still using whole grain flour, but that whole grain flavor wasn’t quite so strong and my family approved. In addition, I liked the texture slightly better.
I would have told you this before Christmas, but I forgot to write down what I had done and I wasn’t positive I remembered correctly. I didn’t want to mess up anyone’s Christmas cinnamon rolls, but I took the chance myself and made them again do what I thought I had done the last time. So now I’m sure.
I’m not going to repost the recipe, but I will make a note of the change in the whole-grain recipe. I’m sorry I’m too late for you to use this for Christmas or even New Year’s Day, but maybe for Valentine’s Day or as a special birthday treat. Sometimes I make them just because. Just because they’re so good and my family loves them.
I really appreciate those of you who have left comments or emailed me about the cinnamon roll recipes. Discovering that recipe was such a big deal for our family, and I’m glad I can pass it on for others to enjoy.

For more tips and ideas on making gluten-free substitutions, visit JennCuisine.com.
Labels: bread recipes, breakfast recipes
November 16, 2009
Gluten-Free Drop Biscuits Revisited
It seems I can’t just leave a good gluten-free recipe alone. I have to tweak it to see if I can make it better, usually healthier. The way I often do that is by increasing the amount of whole grain slightly and decreasing the starch by an equal amount. I’ve done it with French bread, and French bread rolls. This time I did it with these delightful drop biscuits.
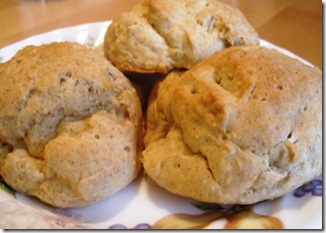
My family of guys likes having bread with a meal. Not always, but often, and it goes well with the soups and stews I make during the colder months. I usually rotate between a few recipes, and these biscuits are a favorite. I can remember years ago making drop biscuits from Bisquick. They were quick and easy and we liked them, but they weren’t great. These biscuits take a little more time since I don’t have a mix, but not much more, and they are so much better!
They are not your typical flaky, buttery biscuits, but they are wonderful. They have a delightfully soft texture. My family loves them, and they didn’t notice any difference when I made this change. I haven’t tried this recipe with other flours. I think it would work, but it is the sorghum that makes them nice and soft.
Ingredients
Combine the dry ingredients in a small bowl. In your mixer bowl, combine the butter, egg and milk. Add the dry ingredients and beat on high about 30 seconds. Scrape down the sides and make sure it is mixed well.
Spray an ice cream scoop with cooking spray and drop the dough by scoopfuls onto a sprayed cookie sheet. Bake at 400 degrees about 12 minutes until golden brown. Makes about 10 biscuits.
View Printable Recipe
This recipe is linked to Slightly Indulgent Mondays at Simply Sugar & Gluten Free.
My family of guys likes having bread with a meal. Not always, but often, and it goes well with the soups and stews I make during the colder months. I usually rotate between a few recipes, and these biscuits are a favorite. I can remember years ago making drop biscuits from Bisquick. They were quick and easy and we liked them, but they weren’t great. These biscuits take a little more time since I don’t have a mix, but not much more, and they are so much better!
They are not your typical flaky, buttery biscuits, but they are wonderful. They have a delightfully soft texture. My family loves them, and they didn’t notice any difference when I made this change. I haven’t tried this recipe with other flours. I think it would work, but it is the sorghum that makes them nice and soft.
Gluten-Free Drop Biscuits

Ingredients
- 1 c. sorghum flour
- 1/2 c. potato starch
- 1/4 c. tapioca starch
- 1 tsp. xanthan
- 1 tsp. cream of tartar
- 3/4 tsp. baking soda
- 1/2 tsp. salt
- 2 Tb. sugar
- 1/4 c. butter, softened (or vegetable oil)
- 1 large egg
- 3/4 c. milk (sub. should work)

Combine the dry ingredients in a small bowl. In your mixer bowl, combine the butter, egg and milk. Add the dry ingredients and beat on high about 30 seconds. Scrape down the sides and make sure it is mixed well.
Spray an ice cream scoop with cooking spray and drop the dough by scoopfuls onto a sprayed cookie sheet. Bake at 400 degrees about 12 minutes until golden brown. Makes about 10 biscuits.
View Printable Recipe
This recipe is linked to Slightly Indulgent Mondays at Simply Sugar & Gluten Free.
Labels: bread recipes
November 1, 2009
Multi-Grain Apple Muffins
There are very few foods I miss since being on a gluten-free diet. One of them is bran muffins. The kind made from All Bran cereal. I don’t miss them a lot, but I miss them a little. I remember getting up in the morning at my grandmother’s house to find warm bran muffins in the crock pot. I loved them with a little butter.
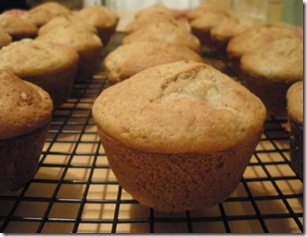
These muffins are great breakfast muffins. The texture is soft, and I love the combination of flavors--grains, apple, and spices. The spices are subtle, so add more if you like. If you don’t have all the flours, you can substitute a gluten-free flour mix for the total amount of flour, or substitute brown rice flour for one or more of the whole grains. These muffins were best when fresh and still warm. They dried out more than most of the muffins I’ve made, maybe because of the buckwheat flour. I didn’t let that keep me from eating them the next day, though. They can be warmed in an oven with a dish of water to add moisture, or in the microwave. Adding a little butter helps too.
Ingredients

Instructions
In a medium sized bowl combine the dry ingredients. In a smaller bowl or glass measuring cup combine the wet ingredients and add to the dry ingredients. Mix until all the flour is moistened. Fold in the chopped apple. I used a large apple and could barely get all the batter into the muffin cups. A smaller apple would work better, or part of a large one. Spoon the batter into a greased muffin tin and bake at 400 degrees for 18 - 20 minutes.
View Printable Recipe
This post is linked to Slightly Indulgent Mondays at Simply Sugar & Gluten-Free.
These muffins are great breakfast muffins. The texture is soft, and I love the combination of flavors--grains, apple, and spices. The spices are subtle, so add more if you like. If you don’t have all the flours, you can substitute a gluten-free flour mix for the total amount of flour, or substitute brown rice flour for one or more of the whole grains. These muffins were best when fresh and still warm. They dried out more than most of the muffins I’ve made, maybe because of the buckwheat flour. I didn’t let that keep me from eating them the next day, though. They can be warmed in an oven with a dish of water to add moisture, or in the microwave. Adding a little butter helps too.
Gluten-Free Multi-Grain Apple Muffins

Ingredients
- 1/2 c. sorghum flour
- 1/2 c. millet flour
- 1/2 c. buckwheat flour
- 1/2 c. potato starch
- 1/3 c. sugar (more or less to taste)
- 1/2 tsp. xanthan gum
- 1 Tb. baking powder
- 1 tsp. unflavored gelatin (optional)
- 1/4 tsp. salt
- 1 tsp. apple pie spice (or just use cinnamon)
- 1/4 c. oil or melted butter
- 2 eggs
- 1 c. milk or substitute
- 1 apple, peeled and chopped

Instructions
In a medium sized bowl combine the dry ingredients. In a smaller bowl or glass measuring cup combine the wet ingredients and add to the dry ingredients. Mix until all the flour is moistened. Fold in the chopped apple. I used a large apple and could barely get all the batter into the muffin cups. A smaller apple would work better, or part of a large one. Spoon the batter into a greased muffin tin and bake at 400 degrees for 18 - 20 minutes.
View Printable Recipe
This post is linked to Slightly Indulgent Mondays at Simply Sugar & Gluten-Free.
Labels: bread recipes, breakfast recipes
October 25, 2009
French Bread Rolls Again

It’s funny how the little things can make a big difference in how difficult a recipe is viewed in my mind. My wonderful French bread isn’t hard to make at all, and doesn’t take much time compared to making a loaf of bread. But I do have to get out the special pan, divide the dough, and shape it. On the other hand, my French bread rolls can just be scooped up with an ice cream scoop and plopped on a cookie sheet. Really, there is very little difference in time, but for some reason the rolls seem so quick and easy. I can have them made in 35 minutes, and I don’t even have to remember to preheat the oven. They have become a favorite.
I was down with the flu all last week and am still getting over it, but I was determined to put dinner on the table every night. I had frozen some leftover ground roast beef which I used for spaghetti one night, but there was still quite a bit left. My husband suggested beef sandwiches so I put together some French bread rolls and served them with the beef in the middle and broth on the side for dipping. Unfortunately, the beef just wasn’t the best, which led son #2 to say, “Okay mom, you’re not allowed to get sick any more.” Son #3 thought they were good, though, as did I, and son #1 isn’t picky. Food is mostly fuel to him. With good roast beef on these sandwiches they would have been great, and it was a quick meal.
I’m writing about the rolls again because I’m always experimenting with recipes and trying to increase the amount of whole grain. This time I decreased the potato starch by 1/2 cup and increased the sorghum and millet by 1/4 cup each. The rolls turned out just as well as they did before, so that’s the recipe I’m sticking with. If you don’t have both sorghum and millet, try using just one. My French bread recipe uses only sorghum so I’m sure that would work fine. Since I increase the amount of whole grain in this recipe, I’m submitting it for this week’s Slightly Indulgent Mondays at Simply Sugar & Gluten Free.
Here is the recipe with the changes.

Gluten-Free French Bread Rolls
Ingredients3/4 c. sorghum flour

3/4 c. millet flour
1 c. potato starch
1/2 c. tapioca starch
1 1/2 tsp. salt
1 Tb. sugar
2 tsp. xanthan gum
1 1/2 Tb. instant yeast
1 Tb. olive oil
3 large egg whites
1 tsp. cider vinegar
1 c. warm water (105 – 115 degrees)
Instructions
In the bowl of your mixer, combine the dry ingredients. Add the olive oil and egg whites and mix to incorporate. Add the vinegar and most of the water. Beat for 2 minutes, adding the remaining water if needed to make a soft dough. (I held back 2 Tb.)
Using an ice cream scoop or spoon sprayed with non stick cooking spray, scoop the dough onto a large greased cookie sheet. Spraying the scoop helps, but I had to re-spray every couple of times.
Put the cookie sheet into a cold oven. Set the temperature at 400 degrees and bake about 25 minutes, depending on the size of the rolls. The rolls should be light brown on the outside. Remove from the cookie sheet and cool on a wire rack.
View Printable Recipe
Labels: bread recipes

Subscribe to Posts [Atom]
