February 7, 2011
Curried Roast and Carrots (Slow Cooker)

Curry is not a spice I have been known to cook with, but after seeing a number of tasty looking recipes that used curry, I recently picked some up at the grocery store. I knew my husband wouldn’t be thrilled with it, but he has been known to learn to like new foods and flavors. I was just waiting for the right moment.
Last week, several of us in the house were fighting colds, and one particular day I decided to put dinner in the slow cooker, because I knew I wouldn’t feel up to cooking later that evening. I had a top round roast that needed to be used, and as I was deciding what to do with it I remembered the curry. Yes, some strong spices like curry and ginger seemed perfect for combating a cold. This is the resulting recipe. I can’t say it was a huge hit with my husband. He ate it, but wasn’t interested in the leftovers. The kids did enjoy it though, so I think it will make its way to are table again after a while.
This recipe is large because I was using a large slow cooker (mine is 6 quart) and because I had a large roast. You could easily cut this in half, but it would work best in a smaller (3-4 quart) slow cooker.

Slow Cooker Curried Roast & Carrots
- 3 1/2 – 4 lb. roast (I used a top round roast, but chuck roast should work too)
- 2 large onions
- 10 medium – large carrots (~1 1/2 lbs.)
- 2 bay leaves
- 1 c. beef broth
- 1 Tb. curry powder
- 1 1/2 tsp. ground ginger
- 1 tsp. salt
- 1/2 tsp. black pepper
- 1/4 c. minute tapioca
Combine the broth, curry powder, ginger, salt, pepper, and tapioca. Pour about half over the vegetables. Place the roast on top, and pour the remaining broth over it. Cover and cook on low for about 3-4 hours or until the meat reaches your desired internal temperature. If you want the vegetables more done, turn your slow cooker to high and continue to cook them while the meat rests.
A green side salad goes nicely with this meal.
View Printable Recipe
Labels: beef, main dish recipes

January 28, 2011
Fried Rice Variations

It’s been a while since I posted a dinner recipe, and most of us benefit from a few new dinner ideas. If you’re like me, it can be easy to get stuck in a rut of making the same recipes. That’s why I love sharing what we’re having for dinner on my Facebook page. On weeknights, I post what we’re having (usually between 5:00 and 6:00 p.m. eastern time) and other people leave comments telling us what they are having. It’s a great place to get new ideas, especially if you are new to the gluten-free diet.
This dinner is nothing fancy. It was quick and easy and also quite good. In fact, I was simply using up leftovers in my refrigerator. I want to share it with you to remind you that we don’t always have to follow recipes exactly as they are used traditionally. Fried rice is a well known dish, and the idea of it can be used in many ways. For this meal I fried leftover rice, red quinoa, and pasta. I didn’t have enough of any one of those, but combined, it was just the right amount.
I added in cubed leftover pork chops, zucchini, and of course egg which is a common ingredient in fried rice. The great thing about fried rice is that you can use so many different ingredients. By varying the meat, vegetables, and grain, you can create numerous meals that are basically the same recipe but taste very different. Here is a version I made using brown rice, onions, red pepper, zucchini, mushrooms, and ham.

In addition to being quick and easy, fried rice is also a frugal meal for several reasons. 1) If you use leftovers as I did, then it's a great way to keep food from going to waste. 2) You can use only a little meat and add eggs for additional protein. 3) Rice is generally inexpensive. Quick. Easy. Frugal. Tasty. What more could you ask for?
I don’t have a real recipe for you, but I’ll give you some guidelines for those who aren’t used to making fried rice.
Basic Fried Rice
(amounts are all approximate)- 4 cups cooked rice, pasta, other grain, or a combination
- 2 Tb. high heat oil of choice
- 1-2 c. leftover cubed meat (beef, pork, ham, or chicken)
- 2 c. chopped vegetables (peas, broccoli, zucchini, carrots, mushrooms, onions, peppers, etc.)
- 2 eggs, beaten
- 2 Tb. soy sauce (I used a soy-free coconut version)
- salt & pepper to taste
View Printable Recipe
You can find other frugal ideas at the Frugal Fridays blog carnival at Life As Mom. For more real food recipes, check out Real Food Weekly at the W.H.O.L.E. Gang.
Labels: main dish recipes, pork
January 3, 2011
Baked Salmon

My family loves salmon. I will often buy cheaper fish such as tilapia, but once in a while I spend the extra money on salmon. It’s a meal that I know all five of us will enjoy, so I try to time it for an evening when everyone will be home for dinner.
When the weather is warm I often do this recipe on the grill. I have cooked salmon directly on the grill, but wrapping it in foil is my favorite way to cook it, whether on the grill or in the oven. Wrapping the fish in foil keeps it from drying out and produces delicious results every time. This is one of those unrecipes where I just tell you what ingredients I use. The amounts don’t need to be exact.
Baked Salmon
Preheat oven to 375°- salmon filet
- olive oil
- lemon juice
- salt
- dried basil
- dried parsley
Bake at 375° about 30 minutes. The length of time will depend on the thickness of the fillet. Open the foil very carefully because still will escape. I often use two knives for this so I can keep my hands farther back. Test for doneness. If you have a very large filet, you may want to remove parts that are done and return the thickest center part to the oven for another 10 minutes.
View Printable Recipe
For more great recipes (though not necessarily gluten-free) visit Slightly Indulgent Tuesdays.
Labels: main dish recipes, seafood
December 6, 2010
Chicken Scampi

This recipe was delicious and a real hit with my kids (remember, I have teens, not little kids). Apparently Olive Garden makes a chicken scampi which you can find copy cat recipes for online. Those recipes, however, include a white sauce that is added to the scampi sauce. I chose not to do that, simply for the sake of saving time. Having eaten it without the white sauce, I have absolutely no desire to try the recipe with it. It didn’t need anything else in our opinions.
While omitting the white sauce cut down and preparation time and the number of pieces to think about, this is not what I would call an easy recipe. I had it ready in about 45 minutes, but I was constantly working on one or more parts. For that reason, I have written the directions to try and help you know what order to go in so that the things that take the most time get started first.
Chicken Scampi (Gluten & Dairy Free)
- 16 oz. gluten-free spaghetti (I used Tinkyada)
- 3 Tb. Earth Balance stick margarine or butter
- 2 Tb. minced garlic
- 2 tsp. Italian seasoning
- 3/4 c. white cooking wine (or dry white wine)
- 1 c. chicken broth
- pepper to taste
- 2 1/2 boneless skinless chicken breasts
- 1 large yellow onion
- 1 red bell pepper
- 2 Tb. oil or butter (I used palm oil)
When the water boils, add your pasta and get that cooking.
While the scampi sauce is simmering, slice the onion and pepper in thin slices. Add 1 tablespoon oil to a large skillet and sauté the onion and pepper until tender. While it cooks, slice the chicken breasts into thin strips. When they are done, remove the onion and pepper strips to a bowl. Add another tablespoon of oil to the skillet and add the chicken strips. Cook and turn until the meat is cooked through.
After your pasta is done cooking, drain it and place it in a warm bowl. After the scampi sauce is done simmering, pour it over the pasta and toss to coat.

Place the onions, pepper, and chicken on a serving plate and place some on top of the pasta when serving it.

View Printable Recipe
For more great recipes (not all but many are gluten free) visit Slightly Indulgent Tuesdays. This post is also linked to Lisa's Food and Health Carnival.
Labels: chicken, main dish recipes
November 29, 2010
Roast Beef Skillet Meal
As I have mentioned before, I like cooking food, particularly meat, that will last for two meals. Recently I shared a way to use leftover roast chicken in soup. This week I’m sharing a way to use leftover roast beef. I cooked a large chuck roast the first night. Chuck roast is inexpensive and becomes tender when cooked in a slow cooker or pressure cooker. I cooked mine in the pressure cooker for 1 hour under high pressure and it was perfect.
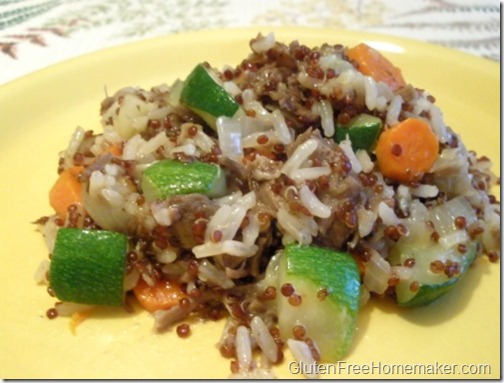
This recipe is an all-in-one meal. I used a combination of white rice and red quinoa for the grain. The two can be cooked together. I cook mine in a pressure cooker for 5 minutes under low pressure. You could use any variety rice and/or quinoa that your family likes. I used broth I saved from cooking the roast to cook the rice/quinoa mix.
View Printable Recipe
This recipe is an all-in-one meal. I used a combination of white rice and red quinoa for the grain. The two can be cooked together. I cook mine in a pressure cooker for 5 minutes under low pressure. You could use any variety rice and/or quinoa that your family likes. I used broth I saved from cooking the roast to cook the rice/quinoa mix.

Roast Beef Skillet Meal
- 2 Tb. cooking oil (I used safflower)
- 2 medium carrots, sliced
- 1 medium onion, chopped
- 1 large zucchini, cut in chunks
- 2 – 3 cloves garlic, chopped
- 2 Tb. red cooking wine (or dry red wine)
- 2 c. leftover roast beef, cubed
- 2 c. cooked rice and/or quinoa
- beef broth or water for cooking the rice/quinoa
- salt & pepper
View Printable Recipe
Labels: beef, main dish recipes
November 15, 2010
Ham Loaf
 The holidays are approaching, and while we often look for new recipes to serve on the actual holiday, it’s also nice to have new ways to use the leftovers. This is a great way to use leftover cooked ham. I know Thanksgiving is turkey day, but some people might also serve ham. I actually used turkey ham for this recipe.
 Ham loaf might not be new to you, but was new for me. I was looking for a way to use up some ham and came across a ham loaf recipe. I then looked up other similar recipes and came up with a combination of things I liked best about each. We really enjoyed this ham loaf and I know I’ll be making it again.
I have seen recipes for larger loaves, but they take longer to cook (up to 2 hours). An hour cooking time is pushing it for me. I put the loaf together in the morning, placed it in the loaf pan, covered it with foil, and refrigerated it until evening. Then while the oven was preheating I made the glaze to go on top.
Most glaze recipes use some vinegar with the water, or even all vinegar. My family does not like vinegar and I was afraid it would ruin the ham loaf for them. Feel free to substitute apple cider vinegar for part of the water in the glaze.

Gluten-Free Ham Loaf
- 1 lb. cooked ham, ground
- 1/2 lb. ground turkey (uncooked)
- 1/2 c. milk or substitute (I used almond milk)
- 1/2 c. instant potato flakes (most are gluten free, check the label)
- 1 egg
- 1/4 tsp. pepper
- 1 tsp. onion powder 1/4 – 1/3 c. chopped onion
- 6 Tb. water
- 1/2 c. brown sugar
- 1 Tb. mustard
 Place all the loaf ingredients in the bowl of your stand mixer and mix on low for about a minute of just until all the ingredients are well combined (no lumps of potato flakes). Or put the ingredients in a large bowl and mix by hand.
Press the mixture together and place it in a greased/sprayed 9 x 5 inch loaf pan. Press it into a loaf shape.
Combine the glaze ingredients in a small sauce pan and heat until boiling. Boil a couple of minutes, then pour over the loaf.
Bake the loaf at 375° for about 45 – 55 minutes, basting once or twice.
View Printable Recipe
This post is part of Slightly Indulgent Tuesdays, Tasty Tuesday and Tempt My Tummy Tuesday. All are food carnivals which are not gluten-free, but you may find some naturally gluten-free recipes there as well as inspiration for converting recipes to be gluten free.
Labels: main dish recipes, pork
October 25, 2010
Poached Chicken Thighs and Chicken Stock
Cooked chicken and chicken stock are useful in so many recipes. I like to cook a batch of chicken and make stock at the same time. Either can be frozen and pulled out when you need them. You can use chicken breasts for this, but chicken thighs are both flavorful and economical.
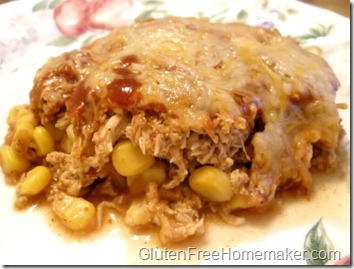
One way I like to use cooked chicken is to make chicken salad. It makes a great high protein lunch or snack. It can be put on a green salad, bread, or crackers, or eaten with chips. I also like using chicken in casseroles. Here are a few that use cooked chicken.


Remove the chicken pieces to a plate to cool, then skin and debone them. Chop or shred the chicken and store in the refrigerator or freezer. (Chicken can easily be shredded in your KitchenAid stand mixer.) Strain the broth to remove the vegetables. Cool and pour into glass jars and refrigerate. The fat can easily be removed after it has chilled. Once chilled, you can measure and pour into zip top freezer bags. If you lay these flat in your freezer, they will thaw in cold water much more quickly than if you put them in a jar. I like to freeze 2 cup portions. Don’t forget to label the bags! Makes approximately 2 quarts stock.
One way I like to use cooked chicken is to make chicken salad. It makes a great high protein lunch or snack. It can be put on a green salad, bread, or crackers, or eaten with chips. I also like using chicken in casseroles. Here are a few that use cooked chicken.


Poached Chicken & Chicken Stock
- 5 – 6 lbs. chicken thighs with skin and bones
- 1 medium onion, thickly sliced
- 1 large carrot, cut in 1 inch chunks
- 1 stalk celery with leaves, cut in 1 inch chunks
Remove the chicken pieces to a plate to cool, then skin and debone them. Chop or shred the chicken and store in the refrigerator or freezer. (Chicken can easily be shredded in your KitchenAid stand mixer.) Strain the broth to remove the vegetables. Cool and pour into glass jars and refrigerate. The fat can easily be removed after it has chilled. Once chilled, you can measure and pour into zip top freezer bags. If you lay these flat in your freezer, they will thaw in cold water much more quickly than if you put them in a jar. I like to freeze 2 cup portions. Don’t forget to label the bags! Makes approximately 2 quarts stock.
Labels: chicken, main dish recipes
October 17, 2010
Spaghetti Squash Casserole
This post was written last November, and I thought I would repost it since the recipe was so good, and it fits well with the Squash Fest. Unfortunately, it does contain cheese and is not dairy free unless you use a substitute.
My only experience with squash that I remember from childhood was when my mom would slice, batter, and fry yellow squash. I hated it. I hated the flavor and texture. That experience led me to believe that I didn’t like any squash. Somewhere down the road I learned to like zucchini, and it has been a staple vegetable in our house for a while.
Other than that, I stayed away from squash until last fall when I made butternut squash soup. My family wasn’t too thrilled with it, but I enjoyed it. I made that soup again last week and their tastes had improved to tolerating it.
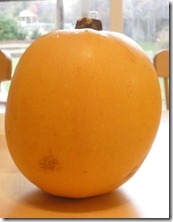 This fall I tried spaghetti squash. I’ve used it twice now. The first time I had a rather large squash that I baked in the oven, whole. It was still a little crunchy when I served it in place of spaghetti noodles. The family didn’t mind the taste, but thought crunchy spaghetti was a little weird.
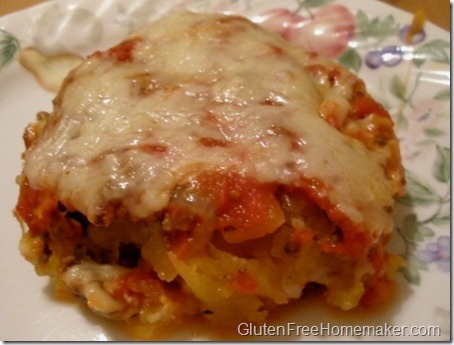
The second time I bought a smaller squash and cooked it in my pressure cooker. It turned out a little bit too done and the strands were not as distinguishable. That was okay because I decided to use it in a casserole. I didn’t have any ricotta cheese to make a lasagna type dish, so I decided on a variation of my pizza casserole. It turned out great, and everyone liked it! My oldest said he didn’t mind the squash as long as there was plenty of meat and cheese, which there was.
 If you’ve never cooked a spaghetti squash before, there are several ways you can do it. You can bake it whole by putting some holes in it with a sharp knife or a skewer and placing it in a pan. Bake it at 375 degrees about 1 hour. You can also cut it in half, clean out the inside and bake it cut side down in a pan with some water for 30 –40 minutes. I cut it in half and placed it in my pressure cooker. I cooked it under high pressure for 10 minutes, but 8 might have been better.

When it is done cooking, use a fork or large spoon to pull out the flesh and scrape it away from the outer rind. It will look something like this. For this recipe you should cook the spaghetti squash first and have it ready to go into the casserole.
Gluten-Free Spaghetti Squash Casserole

Instructions
Cook the spaghetti squash and scrape out the flesh. Cook the ground beef, onion and garlic together and drain any fat. In a greased 9 x 13 inch casserole dish put half the squash, spreading it over the bottom of the dish.

Put half the beef/onion mixture on top of the squash.
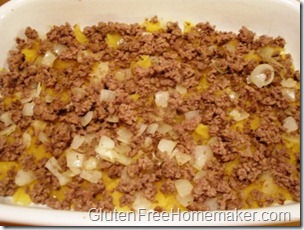
Spread half the pasta sauce on top and then sprinkle with half the cheese.


Repeat the layers. Bake at 350 degrees for 30 minutes. Let sit for 5 – 10 minutes before serving.
View Printable Recipe
Spaghetti squash is a great alternative to pasta, especially this time of year when they are in season and inexpensive. It’s an easy way to make a gluten free dish, but this recipe is worth making whether you have to eat gluten free or not.
This post is linked to Tasty Tuesday, Tempt My Tummy Tuesday, Ultimate Recipe Swap, and Friday Foodie Fix. Some of the carnivals are not gluten free, but do include links to naturally gluten-free recipes as well as ones that could easily be converted.

My only experience with squash that I remember from childhood was when my mom would slice, batter, and fry yellow squash. I hated it. I hated the flavor and texture. That experience led me to believe that I didn’t like any squash. Somewhere down the road I learned to like zucchini, and it has been a staple vegetable in our house for a while.
Other than that, I stayed away from squash until last fall when I made butternut squash soup. My family wasn’t too thrilled with it, but I enjoyed it. I made that soup again last week and their tastes had improved to tolerating it.
 This fall I tried spaghetti squash. I’ve used it twice now. The first time I had a rather large squash that I baked in the oven, whole. It was still a little crunchy when I served it in place of spaghetti noodles. The family didn’t mind the taste, but thought crunchy spaghetti was a little weird.
 The second time I bought a smaller squash and cooked it in my pressure cooker. It turned out a little bit too done and the strands were not as distinguishable. That was okay because I decided to use it in a casserole. I didn’t have any ricotta cheese to make a lasagna type dish, so I decided on a variation of my pizza casserole. It turned out great, and everyone liked it! My oldest said he didn’t mind the squash as long as there was plenty of meat and cheese, which there was.
 If you’ve never cooked a spaghetti squash before, there are several ways you can do it. You can bake it whole by putting some holes in it with a sharp knife or a skewer and placing it in a pan. Bake it at 375 degrees about 1 hour. You can also cut it in half, clean out the inside and bake it cut side down in a pan with some water for 30 –40 minutes. I cut it in half and placed it in my pressure cooker. I cooked it under high pressure for 10 minutes, but 8 might have been better.
When it is done cooking, use a fork or large spoon to pull out the flesh and scrape it away from the outer rind. It will look something like this. For this recipe you should cook the spaghetti squash first and have it ready to go into the casserole.
Gluten-Free Spaghetti Squash Casserole

- 1 small spaghetti squash
- 1 – 1 1/2 lbs. ground beef
- 1 medium onion, chopped
- 2 cloves garlic, minced
- 1 jar pasta sauce
- 8 oz. shredded mozzarella cheese
Instructions
Cook the spaghetti squash and scrape out the flesh. Cook the ground beef, onion and garlic together and drain any fat. In a greased 9 x 13 inch casserole dish put half the squash, spreading it over the bottom of the dish.

Put half the beef/onion mixture on top of the squash.

Spread half the pasta sauce on top and then sprinkle with half the cheese.


Repeat the layers. Bake at 350 degrees for 30 minutes. Let sit for 5 – 10 minutes before serving.
View Printable Recipe
Spaghetti squash is a great alternative to pasta, especially this time of year when they are in season and inexpensive. It’s an easy way to make a gluten free dish, but this recipe is worth making whether you have to eat gluten free or not.
This post is linked to Tasty Tuesday, Tempt My Tummy Tuesday, Ultimate Recipe Swap, and Friday Foodie Fix. Some of the carnivals are not gluten free, but do include links to naturally gluten-free recipes as well as ones that could easily be converted.
Labels: beef, main dish recipes
October 11, 2010
Chicken, Vegetable, & Pineapple Skillet Meal

This meal is delicious as is, but if you eat soy, you might enjoy soy sauce added to it. I am on a soy free diet, and my family doesn’t particularly like soy sauce so I didn’t use any. My husband is not a big fan of fruit such as pineapple with his meat (poultry), but I sneak it in occasionally. He didn’t mind it too much in this dish and the kids really enjoyed it. It surprised me how much flavor a little canned pineapple added. It was definitely nice for a change.
This recipe is perfect for using leftover chicken. You can use white or dark meat or a combination of both. I used thighs for the recipe in the photo. I served this over a mix of rice and quinoa. It wasn’t the best combination with red quinoa, and next time I will serve it with brown rice or pasta.
Chicken, Vegetable, & Pineapple Skillet Meal
- 1 medium onion, chopped
- 1 red bell pepper, diced
- 3 cloves garlic, minced
- 1 – 2 Tb. cooking oil
- 2 c. cubed cooked chicken
- 1 c. crushed pineapple with juice
- 1 14.5 oz can diced tomatoes with juice
- salt & pepper to taste
- 1 Tb. corn starch
- 2 Tb. cold water
View Printable Recipe
Labels: chicken, main dish recipes
October 4, 2010
Chicken Cacciatore (Slow Cooker)

When I search for chicken cacciatore recipes, I’m surprised by how different they all look. Some look like chicken parmesan, one looks like a stew, and countless others are somewhere in between. I don’t know if this recipe is what you picture when you think of chicken cacciatore, but I do know that it tastes good.
I used boneless skinless chicken breasts for this recipe, but thighs would work well too, or a combination. You should use skinless pieces, but it would be okay to use bone-in. In fact, if you like moist chicken, bone-in chicken thighs are a great economical choice. Boneless breasts are a great choice, though, and these turned out very moist.
Most chicken cacciatore recipes include mushrooms. I enjoy them, but not all of my family does, so I didn’t use any. If you like mushrooms, just add sliced mushrooms of choice to the bottom of the crock pot with the vegetables.
Slow Cooker Chicken Cacciatore
- 1 medium onion, chopped
- 1 bell pepper, chopped (I used purple)
- 2 cloves garlic, minced
- 3-4 lbs. boneless, skinless chicken breasts
- 1 can (14.5 oz. diced tomatoes)
- 3 Tb. tomato paste
- 1 c. chicken broth
- 1/2 c. white cooking wine
- 1/2 tsp salt (or to taste)
- 1/8 tsp. pepper (or to taste)
- 1 tsp. Italian seasoning
- 1 bay leaf
- 3 Tb. corn starch
- 3 Tb. water
View Printable Recipe
This post is linked to Slightly Indulgent Tuesdays at Simply Sugar & Gluten Free.
Labels: chicken, main dish recipes
September 20, 2010
Slow Cooker Herbed Chicken & Vegetables

My new crock pot is not overcooking and drying out everything I put in it like my old one did, but I still find that most food cooks pretty quickly. For example, this recipe only took 4 hours on low and the chicken would have been way too dry if it had cooked 6 – 8 hours. That means I get dinner started in my slow cooker in the afternoon, which isn’t convenient for someone who is at work in the afternoon. So unless you have an old crock pot that you know you can leave all day, don’t expect this recipe to cook while you are at work. Instead, try it on the weekend.
Chicken breasts have become one of my favorite things to put in the slow cooker. Since I have a large crock I usually cook plenty of it. The leftovers are used for lunches or turned into chicken salad. Feel free to cut this recipe in half, but only if you have a 4 quart cooker.
Herbed Chicken and Vegetables
- 1 1/2 c. sliced mushrooms (use your favorite kind)
- 1/3 c. chopped red bell pepper
- 1 c. sliced carrots
- 3/4 c. chopped onion
- 1 c. chicken broth
- 4 lb. boneless, skinless chicken breasts (~ 6 large)
- 2 cloves garlic, minced or grated
- 1/4 tsp. ground thyme
- 1/2 tsp. dried basil
- salt & pepper to taste
View Printable Recipe
This post is linked to the following food carnivals. The links there are not necessarily gluten-free, but many are, and others can be converted.
Labels: chicken, main dish recipes
September 6, 2010
Eggplant & Tomato Pasta Sauce
 I’ve been receiving eggplant in my CSA box the last few weeks, and I bet some of you have too. I usually use eggplant in ratatouille, but that recipe uses the oven. So would something like eggplant parmesan, plus I’m back to being dairy free. I wanted a recipe that used the stove top, and I was in the mood for pasta. The result was a pasta sauce with eggplant. I’m sure this would also work great in a slow cooker.
 Image via Wikipedia
I don’t cook with eggplant very often since my husband and one of my kids are not fond of it. However, I didn’t remember why my son doesn’t like it. When I saw him picking the eggplant out of this sauce, I told him he needed to eat his vegetables. He said, “Eggplant upsets my stomach and makes my tongue hurt.” If he was a little kid I might think he was making it up, but at 16 he wouldn’t say it makes his tongue hurt and expect to get away with it unless it was true. As for his stomach, red delicious apples bother him too, and he loves apples. And so, eggplant will continue to be something I cook only occasionally.

Gluten-Free Eggplant Pasta Sauce
- 8 c. chopped eggplant
- 2 Tb. salt
- 4 c. skinned and copped tomatoes
- 1 large onion, chopped
- 1/2 c. chopped bell pepper (color of choice, I used red & purple)
- 1 large clove garlic, minced
- 2 Tb. olive oil
- 1 tsp. dried basil
- 3 oz. tomato paste
- 1/2 – 1 lb. ground beef, turkey or sausage
The tomatoes can easily be skinned by putting them into a pot of boiling water for 1 minute. Remove to a bowl of ice water. The skins will come right off the tomato. Chop the tomatoes, but do not drain them.
In a large skillet sauté the onion, peppers and garlic in the olive oil. When they have softened some, add the eggplant, tomatoes, and basil. Cook until the eggplant and tomatoes are softened. If the mixture needs to be thickened, add tomato pasted until it is the consistency you want.
While that is cooking, cook the meat in another skillet until browned and cooked through. Drain the meat and stir it into the sauce. Serve over pasta.
Makes about 8 servings.
View Printable Recipe
For more fabulous food made a little bit healthier, visit Slightly Indulgent Tuesdays.

Labels: main dish recipes
August 30, 2010
Brown Rice Salad
Two of my three boys are fair skinned with reddish hair. They sunburn easily which is one of the reasons summer is not my favorite season. We haven’t had a pool membership for a number of years, but we did when they were little. The problem was that even with 30 or 50 spf sunscreen, my oldest would burn anytime before 4 pm. As a result 4:00 – 6:00 was our usual pool time. On Sundays, we often went as a family and ate dinner there—a cold dinner that I could pack in the cooler.
This salad was one of my stand-by recipes for such occasions. It still reminds my boys of those days. While it works as a cold meal, we prefer it warm so I suggest trying it that way first.

If serving this cold, use leftover chicken or ham and do not heat it. Follow the directions above and chill before serving.
View Printable Recipe
This recipe is linked to the following food carnivals which are not gluten-free, but are still a good resource.
This salad was one of my stand-by recipes for such occasions. It still reminds my boys of those days. While it works as a cold meal, we prefer it warm so I suggest trying it that way first.

Gluten-Free Brown Rice Salad
- 3 c. cooked brown rice (variety of your choice)
- 1 1/2 c. cooked chicken or ham, cut in small chuncks
- 1/2 c. green onions, sliced
- 1/2 c. sliced almonds
- 1/4 c. mayonnaise
- 1/4 c. Italian salad dressing
If serving this cold, use leftover chicken or ham and do not heat it. Follow the directions above and chill before serving.
View Printable Recipe
This recipe is linked to the following food carnivals which are not gluten-free, but are still a good resource.
Labels: main dish recipes
August 23, 2010
Zucchini Scramble
Two out of three zucchini plants are still in my garden, but they are no longer producing. I had a little bit of powdery mildew which I was able to control, but the real problem was squash vine borer. Those little buggers can kill a plant quickly. My remaining plants are hanging on, and I keep hoping I’ll find a nice size zucchini on them again. All I’ve harvested over the past couple of weeks has been a couple of tiny zucchini that would not get any bigger.
I am still getting some zucchini from my CSA box, though, and since it’s one of our favorite vegetables, I’m always interested in zucchini recipes. This modified recipe came from that cookbook I found at the library this summer.
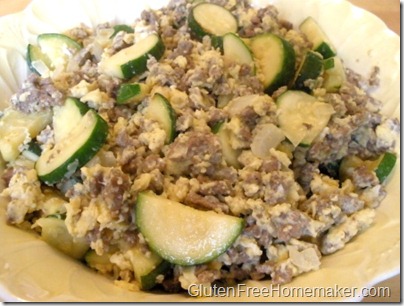
Gluten-Free Zucchini Scramble
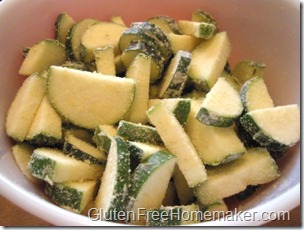
Heat the oil in a large skillet and stir-fry the zucchini, onion, and garlic with the basil or dill until the onion and zucchini are tender.
In a separate skillet, brown the ground beef and drain. Or, you could cook the beef first, remove it from the skillet and then cook the veggies. Combine the beef and vegetables in one skillet. Season with salt and pepper.
Beat the eggs with the water (or milk) and pour over the mixture in the skillet. Heat and stir until the egg is set.
View Printable Recipe
I served it in this lovely antique dish.

For more fabulous (mostly gluten-free) recipes, check out Slightly Indulgent Tuesdays. For more gluten-free ideas visit Lisa's new carnival Gluten-Free & Healthy.
I am still getting some zucchini from my CSA box, though, and since it’s one of our favorite vegetables, I’m always interested in zucchini recipes. This modified recipe came from that cookbook I found at the library this summer.

Gluten-Free Zucchini Scramble
- 1 small onion
- 3 small zucchini
- 2 Tb. millet flour (or other gf flour)
- 2 cloves garlic
- 1 tsp. dried basil or dill (or other herb of choice)
- 1 Tb. coconut oil (or oil of choice)
- 1 lb. ground beef
- 6 eggs
- 1/4 c. water
- salt & pepper to taste

Heat the oil in a large skillet and stir-fry the zucchini, onion, and garlic with the basil or dill until the onion and zucchini are tender.
In a separate skillet, brown the ground beef and drain. Or, you could cook the beef first, remove it from the skillet and then cook the veggies. Combine the beef and vegetables in one skillet. Season with salt and pepper.
Beat the eggs with the water (or milk) and pour over the mixture in the skillet. Heat and stir until the egg is set.
View Printable Recipe
I served it in this lovely antique dish.

For more fabulous (mostly gluten-free) recipes, check out Slightly Indulgent Tuesdays. For more gluten-free ideas visit Lisa's new carnival Gluten-Free & Healthy.
Labels: beef, main dish recipes
August 16, 2010
Grilled Pizza
 I have three teenage boys and they like pizza. Honestly, it’s one of my favorite foods too. It was one of the first things I worked at converting to gluten free, and it’s a gluten-free food that we all love. The rest of my family is able to eat gluten so of course they have pizza at a party or restaurant once in a while. They like wheat pizza, but they also like my gluten-free pizza. The pizzas are different, but most of the time my family likes my gluten-free pizza as much as and sometimes more than a regular pizza (it depends on the pizza).
 My pizza recipe was one of the first things I posted on this blog. It makes a fairly thick large rectangular crust and a round crust. I then modified it slightly and posted a single crust recipe that is a little easier. (I just added some new photos to that post.) I like using both recipes, and while both make a somewhat thick crust, they can be made into a thin crust by simply using the same amount of dough to make a larger pizza. For example, you might use the single crust recipe in a rectangular cookie sheet rather than a round pizza pan. The crust will be a little thinner, but the pizza will be larger.
When the weather is cool, I make gluten-free pizza most Friday evenings. When the weather gets hot, though, I refuse to do it. I won’t heat up the kitchen and much of the house just for pizza. A friend of mine makes her regular wheat pizza on the grill, so this summer I decided to try it with gluten-free pizza.
I followed my recipe as usual except anytime it was supposed to go in the oven, I put it on my gas grill. My grill has a thermometer so I kept the controls adjusted to keep the temperature at about 400 degrees. The pizza dough went on rectangular cookie sheets and I just baked one at a time. First, I precooked the crust:
 Then I added everything and finished baking:
 As you can see, the crust did not brown well, but it was still cooked through and tasted good. It’s not my preferred way to make pizza, but it gets the job done, and makes my family happy.
 Have you ever grilled pizza?
Labels: main dish recipes
August 11, 2010
Spaghetti Sauce From Scratch
I’ve just never bothered with making spaghetti sauce from scratch. One of the things I really like about spaghetti is that it can be a quick and easy meal when using sauce from a jar. The other reason I never made it is that so many recipes use canned tomatoes. To me, that’s not completely from scratch and if I’m going to open cans of tomatoes, I might as well just open a jar of sauce.
 I’m actually not very fond of tomatoes. I like them cooked just fine, but I don’t like them raw. I don’t like the taste, smell or feel of them. I even dislike tomato plants. I have grown a few tomato plants over the years for the sake of my family and this year I decided to try a grape tomato plant. That one plant has produced an abundance of tomatoes over the past few weeks and I have learned that I don’t mind eating them raw (the smaller the better, though).
So when I started receiving lots of large tomatoes from my CSA box I knew I would have to do something with them. The grape tomatoes were all we needed for regular eating. That led me to deciding to try spaghetti sauce from scratch. I really thought it would be too much work, especially boiling the tomatoes and peeling them, but I was wrong. Sure, it takes longer than opening a jar, but it wasn’t bad at all, and I made of lot of it.
Slow Cooker Spaghetti Sauce

Doing this step doesn’t take long and it makes removing the skins so easy. They slide right off the tomato, and sometimes just fall off. The tomato in this picture was half peeled before I removed any skin.
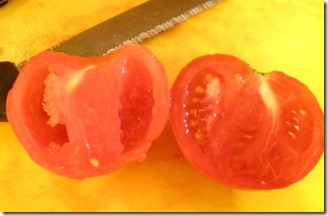
 Once the tomatoes are peeled, slice them in half and use your finger to remove the seeds. You might need to slice them again the same direction to remove more seeds. The tomato half on the left side of this picture has been seeded.
 Now chop the tomatoes. The size is up to you. Place them in a colander while you work on the rest of the sauce. Put a bowl underneath if you want to save the tomato juice. Draining the tomatoes will help keep the sauce from being too watery. I actually skipped this step and wished I hadn’t. I had to later thicken the sauce by reduction.
Brown the ground beef or sausage. When it is halfway done, add the onions and garlic to soften them up some. They cook slowly in the crock pot and I like my onions well done. Drain.
Add everything except the wine to your slow cooker and stir to mix. The herbs can be adjusted to taste.
 Cover it and cook on high 3 – 3 1/2 hours or low 6 – 6 1/2 hours. Stir in the wine, turn the cooker to high if you had it on low, and cook another 30 minutes. Remove the lid during this time if the sauce is too thin.
 This makes a large batch of sauce so you can freeze the extra or plan to use it for more than one meal.
View Printable Recipe
This post is linked to the following food carnivals. The links you will find there are not necessarily gluten-free, but many are naturally gluten-free or can easily be adapted.
 I’m actually not very fond of tomatoes. I like them cooked just fine, but I don’t like them raw. I don’t like the taste, smell or feel of them. I even dislike tomato plants. I have grown a few tomato plants over the years for the sake of my family and this year I decided to try a grape tomato plant. That one plant has produced an abundance of tomatoes over the past few weeks and I have learned that I don’t mind eating them raw (the smaller the better, though).
So when I started receiving lots of large tomatoes from my CSA box I knew I would have to do something with them. The grape tomatoes were all we needed for regular eating. That led me to deciding to try spaghetti sauce from scratch. I really thought it would be too much work, especially boiling the tomatoes and peeling them, but I was wrong. Sure, it takes longer than opening a jar, but it wasn’t bad at all, and I made of lot of it.
Slow Cooker Spaghetti Sauce

- 5 lbs. tomatoes
- 1 large onion, chopped
- 1-2 cloves garlic, minced
- 1 1/2 – 2 1/2 lbs. ground beef or sausage
- 6 oz. can tomato paste
- 1 1/2 tsp. Italian seasoning
- 2 tsp. dried basil
- 1 tsp. dried oregano
- 1 tsp. salt
- 1 tsp. sugar
- 1/4 tsp. pepper
- 2 Bay leaves
- 1/4 c. red wine
Doing this step doesn’t take long and it makes removing the skins so easy. They slide right off the tomato, and sometimes just fall off. The tomato in this picture was half peeled before I removed any skin.
 Once the tomatoes are peeled, slice them in half and use your finger to remove the seeds. You might need to slice them again the same direction to remove more seeds. The tomato half on the left side of this picture has been seeded.
 Now chop the tomatoes. The size is up to you. Place them in a colander while you work on the rest of the sauce. Put a bowl underneath if you want to save the tomato juice. Draining the tomatoes will help keep the sauce from being too watery. I actually skipped this step and wished I hadn’t. I had to later thicken the sauce by reduction.
Brown the ground beef or sausage. When it is halfway done, add the onions and garlic to soften them up some. They cook slowly in the crock pot and I like my onions well done. Drain.
Add everything except the wine to your slow cooker and stir to mix. The herbs can be adjusted to taste.
 Cover it and cook on high 3 – 3 1/2 hours or low 6 – 6 1/2 hours. Stir in the wine, turn the cooker to high if you had it on low, and cook another 30 minutes. Remove the lid during this time if the sauce is too thin.
 This makes a large batch of sauce so you can freeze the extra or plan to use it for more than one meal.
View Printable Recipe
This post is linked to the following food carnivals. The links you will find there are not necessarily gluten-free, but many are naturally gluten-free or can easily be adapted.
- Ultimate Recipe Swap
- Friday Foodie Fix
- Delicious Dishes
- Tasty Tuesday
- Tempt My Tummy Tuesday
- Slightly Indulgent Tuesday
- Real Food Wednesday
Labels: main dish recipes, sauces
July 26, 2010
London Broil on the Grill

Last week Safeway had a good sale on top round London broil ($1.99 per pound). It was packaged in large quantities and the pack I picked up was about six pounds. I decided to cook both steaks and freeze the extra rather than freezing one of them raw.
You can probably tell from the picture that it got overcooked. It was still slightly pink in the middle, but I prefer it to be a darker pink. That was, I think, the fault of my new thermometer which I had not calibrated. It was still good, though. Here’s how I prepare London broil.
Marinating
I works best to marinate London broil about 8 hours before cooking. Any marinade will work, but here’s what I used. It’s a recipe I got from my sister-in-law that I have adjusted slightly. I should have doubled this recipe for both steaks, but didn’t and regretted it later.

Meat Marinade
- 1/4 c. olive oil
- 1/4 c. gluten-free soy sauce
- 2 Tb. honey
- 2 Tb. apple cider vinegar
- 1 tsp. minced garlic
- 1 tsp. powdered ginger
- 2 Tb. chopped green onion
View Printable Recipe
Grilling
Wipe the steak with a paper towel to get rid of excess oil and avoid flare ups. Grill the steak on high heat for about 3 minutes on each side. After that, turn the steak over again and at about a 45 degree angle from the direction it was the first time to get the crisscross grill marks. Reduce the heat to medium and cook approximately another 10 minutes per side. It really depends on the thickness of your steak. A thermometer should read 145° for medium rare.
Remove to a plate and let it sit about 10 minutes. Slice the meat across the grain making the slices as thin as you can get them. An electric knife works well for this.
The sliced meat it great served alone (with sides of course) or on a salad or sandwich.
What is your favorite way to eat London Broil?
For other great recipes visit these blog carnivals:
Labels: beef, main dish recipes
June 21, 2010
Citrus Cinnamon Chicken in the Slow Cooker

Slow cookers (AKA crock pots) are not what they used to be. They used to actually cook slowly! Today’s slow cookers cook hotter than they used to for food safety reasons. I guess I should be glad about that, but I only find it frustrating when my old recipes turn out over done and dry. The first “hot” slow cooker I bought was a 4 quart model and it has things boiling in no time. Recently I bought a 7 quart model hoping the larger pot would not heat quite as quickly. It doesn’t, but it is still hotter than my old ones were. The problem with the 7 quart model is that I have to put a lot of food in it. A crock pot should ideally be 1/2 to 3/4 full. Even with three teenage boys in my family, that makes more than we eat in one meal, often more than we eat in two meals (depending on if it is only meat or meat and vegetables).
In this case, I used 6 pounds of chicken thighs (with bone) that I bought at BJ’s. I like their chicken thighs, but it is a lot to use. It was nice to cook it all at once, have meat for a couple of dinners, and some to put in the freezer. The first night I served the chicken pieces whole with the sauce. For the leftovers, I pulled out the chicken pieces, removed the bones, and shredded the meat, then added it back to the sauce. It was great both ways.
This recipe is a modified version of a recipe from Better Homes and Gardens Biggest Book of Slow Cooker Recipes. In case you are wondering, both the orange and cinnamon flavors are subtle in this, but my family likes subtle. I hope you do too.
Slow Cooker Citrus Cinnamon Chicken
- 1 c. ketchup
- 1/4 c. instant tapioca
- 1 c. orange juice
- 1 stick cinnamon
- 6 lbs. chicken thighs, bone-in, skin removed

Cook on low 6 – 7 hours, or high 4 hours or until chicken is done.

View Printable Recipe
This post is linked to Tempt My Tummy Tuesday, Tasty Tuesday, and Delicious Dishes.
Labels: chicken, main dish recipes
June 7, 2010
Slow Cooker Sloppy Joes

Last week I bought one of those really big packs of ground beef at BJ’s (I think it was 6 pounds). We had burgers Friday night, and yes, I worked on that burger challenge. But I still had a lot of beef left over. Well, Saturday most of us were sick with a tummy virus and didn’t eat, but by Sunday my husband and kids were ready for a meal. I was anxious to try the new crock pot I bought, and I still had a bunch of hamburger buns (not gluten free for the rest of the family) since I bought a big pack of those at BJ’s. If I knew we were going to get sick, I would never have bought large quantities of food, but you never know when these things are going to hit. Anyway, I set out to make Sloppy Joes in my slow cooker. The picture shows it in a bowl because that’s how I ate it, when I did get around to eating, along with some delicious Udi’s bread. You could of course serve it on a bun the way the rest of my family ate it. I was out of gluten-free buns, and I wasn't about to put a picture of a wheat bun on this blog!
This recipe is based on my Mom’s recipe. It makes a lot so you can cut it in half if you don’t need so much, or freeze some for later use. If you are cooking for a crowd, you might need to double it. You can also adjust the ingredients to your taste.

Sloppy Joes
- 3 lbs. ground beef (I used 85% lean)
- 2 c. chopped onion
- 1 1/2 c. diced celery
- 3 cloves minced garlic
- 3 Tb. brown sugar
- 2 Tb. gluten-free soy sauce (Bragg’s Liquid Aminos or San-J wheat free)
- 2 Tb. apple cider vinegar
- 1 1/2 c. ketchup (I used Wild Harvest organic)
- 1/2 c. water
Note: Today’s slow cookers are much hotter than old ones. Even on low I find that 4 hours is often enough. Since the beef is already cooked in this recipe, test the celery for doneness to determine when it’s ready. If it gets done and you are not ready to eat, use the warm setting if you have one.
View Printable Recipe
For more great recipes, visit Delicious Dishes, Tempt My Tummy Tuesdays, Tasty Tuesday, Slightly Indulgent Tuesdays, and Ultimate Recipe Swap.
Labels: beef, main dish recipes, slow cooker

Subscribe to Posts [Atom]
