January 14, 2011
Pot Strainer: Tools of the Trade
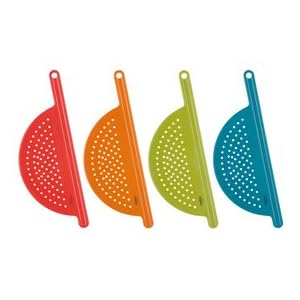
A pot strainer comes in handy any time you want to strain something, but I mostly use it for staining meat that I have browned in a skillet. When you’re done cooking there is fat and liquid that you usually want to strain off. A colander is a practical means of doing this, but I usually prefer a hand held strainer.
What It Is
Pot strainers can be made of metal or plastic. I have a plastic one that I bought from Pampered Chef. The strainers usually have a handle on one end and a center area that is rounded and has holes. You hold the strainer over one side of your pot or skillet and then tilt the pot to pour the liquid into a bowl or other container. The strainer holds the food in the pot/skillet while the holes allow the liquid to pour through.
Why I Like It
I prefer the strainer to a colander for straining meat for two reasons. First, I’m often planning on keeping the meat in the skillet and adding other ingredients to it. With the strainer, I’m not moving the meat back and forth. It stays in the skillet and is simply easier.
Second, because a strainer is smaller than a colander, clean up is easier. Who doesn’t like easier cleanup?
You can find an assortment of pot strainers at Amazon (that is an affiliate link, meaning I get a very small commission on any sales purchased through that link).
Labels: tools of the trade
November 28, 2010
Immersion Blender: Tools of the Trade
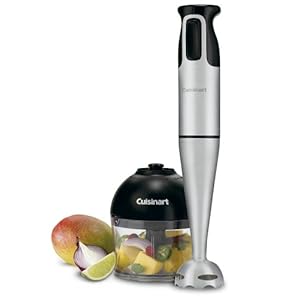
If you are looking for gift ideas to give to a loved one or to put on your wish list, an immersion blender is something worth considering. Until I purchased this one several months ago (with the help of Kohl’s cash), I had never used an immersion blender. That means I’m really not an expert on using it. I had read about people using them for things like butternut squash soup, but their usefulness seemed pretty limited. Still I was interested. Then when I was looking for one to purchase, I found this Cuisinart Smart Stick Hand Blender with Whisk and Chopper Attachments. I thought the mini chopper enhanced the usefulness of the tool, and I was right.
I’m still limited in my use of the immersion blender. It can probably be used in ways I haven’t tried, but what I have used it for it is very good at. I have really enjoyed making butternut squash soup this fall, and I can’t believe how fast the immersion blender turns it into a smooth soup without ever having to transfer hot liquid to and from my blender.
The whisk attachment which came with this blender is handy, but not my favorite choice for a whisk. I can also attach a whisk to my hand mixer, and that is my preference because the mixer has different speed settings. The hand blender is either on or off. That’s it. And it’s pretty fast for a whisk. We’ve had more than one mess to clean up from stuff being flung out of the bowl and spattered around my kitchen! If you do use the whisk, make sure you use a deep bowl, and monitor the kids while they use it. J
The mini chopper attachment is very handy. It’s size is perfect for chopping an onion, a couple of carrots or some nuts. I find that if I leave it out on my counter, I use it pretty frequently. If I put it away, I tend to forget about it and out of habit use a knife and cutting board. If getting uniform pieces of onion is important in your recipe, use a knife; if it doesn’t matter, the chopper sure is quick. I also like the fact that the bowl is small so it doesn’t take up much space in my dishwasher or on the counter.
If you are only interested in the immersion blender, there are plenty to be found without the other attachments. For me, the mini chopper made this particular purchase worth while. I love the immersion blender, but since I don’t use it frequently, I feel that the whole thing is more useful combined with the chopper.
I’m interested in finding more ways to use my immersion blender. If you own one, what do you use it for?
Labels: tools of the trade
September 12, 2010
Waffle Maker: Tools of the Trade
 Since this month’s challenge is to create a gluten-free pancake or waffle, I thought I would talk about the waffle maker. To my knowledge, there is no way to make waffles without a waffle maker, otherwise known as a waffle iron. For years I didn’t own one. In fact, I have owned my first and only waffle maker for less than two years. I will admit that while it is essential to making waffles, it is not essential to a kitchen. A waffle maker takes up valuable space, and if you have a small kitchen, you may not be willing to give up that space. We can live without waffles.
 On the other hand, if you have room for a waffle iron, gluten-free waffles are incredibly easy to make. I was amazed that my first try at a gluten-free waffle recipe was a huge success. I find they are much easier to make than pancakes. For the challenge, I modified my current waffle recipe, and the new one will be posted Monday.
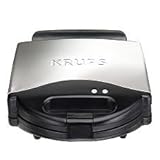
If you are thinking about purchasing a waffle maker, I wish I had lots of information to give you. I don’t, and I’m hoping that some of my readers will leave informative comments. I do know that there are regular, pretty thin waffles and the really fat Belgian waffles. I don’t think there are any makers that make both types, so you have to decide which you want. I also know that there are waffle makers that spin or flip over. In addition, you have to choose how many waffles you want it to make: one, two, or four, and whether you want round or square waffles. I have a Krups 4-Slice Belgian Waffle Maker, but there are lots of waffle makers
I would love hear from those of you who have waffle makers. What are your opinions on:
- What brand you own
- What type of waffles it makes
- How many waffles it makes
Labels: tools of the trade
August 27, 2010
Herb Mincer: Tools of the Trade
mince
- verb (used with object)
1. to cut or chop into very small pieces
(dictionary.com)
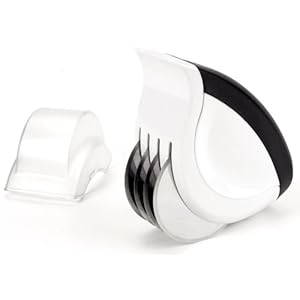
It’s been a while since I’ve done a Tools of the Trade post. With many people bringing in lots of basil from their gardens, I thought I would talk about the herb mincer. I have the Oxo Good Grips Herb Mincer pictured here, but there are many others to choose from.
I wouldn’t say that an herb mincer is an essential kitchen item. I got by for many years using a knife or scissors. However, if you use a lot of fresh leafy herbs like basil or parsley, a mincer is definitely a handy tool to have.

The reason we mince herbs before cooking is to help release their flavors and distribute them in the food we are preparing. Cutting the herb accomplishes this, but crushing it also releases flavor. When I use my herb mincer I get more crushing than I do with scissors.
The white edge you see at the top of the mincer above is used for scraping the pieces of herb together in a pile on your cutting board. I scrape them together, then roll over them which results in some cutting and some crushing.
The thing I don’t like about this type of mincer is that some of the herb pieces get stuck on the blades and are difficult to get off. The mincer comes apart and can be washed in the dishwasher, where it comes clean, but when I’m mincing an herb, I want all the pieces to go in the food!
I’m curious. What do you use to mince herbs?
For more helpful tips check out Works for Me Wednesday.

Labels: tools of the trade
July 25, 2010
Knife Sharpener: Tools of the Trade
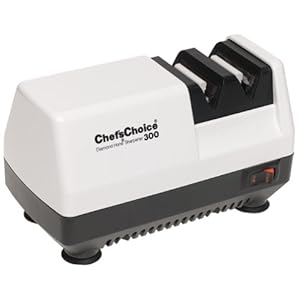
In my Tools of the Trade posts I often highlight kitchen tools that I find very useful, but not essential. A knife sharpener, however, is essential for me. A lot of cutting goes on in the kitchen, and that task is so much easier and in some ways safer with a sharp knife.
I have not invested in an expensive knife set. I understand the importance of good quality tools, but high quality always comes with a high price. Instead, I have decent knives that work well when they are sharp. But they do get dull.
I have a diamond hone sharpener like the one in the picture ($30.90 from Amazon), but there are others to choose from. In fact there are many more choices than there were when I bought mine years ago. I’m not an expert on knives or sharpeners, and I can’t go into explanations about different features. What I do know is that mine works. It doesn’t take long to sharpen a knife, and cutting with a sharp knife makes a task easy.
Just remember to be careful when working with sharp knives. I had one mishap a number of years ago that required a few stitches in my finger, and I will never forget it.
How do you sharpen your knives?
Labels: tools of the trade
June 27, 2010
Magic Bullet: Tools of the Trade
The thing I like about the Magic Bullet is that you make individual smoothies. You actually screw the blender piece directly onto the cup. When you are done, the colored rings are screwed on to make the edge of the cup smooth. If you have kids old enough to make their own smoothie, this is a great way to let them do it. Everyone can make their own just the way they want it. I also like the fact that the cups go straight into the dishwasher and there is no big blender bowl to clean up.
Smoothies are a great way to get fruit and vegetables into your kids. There are lots of smoothie recipes out there, but really all you need to do is put in fruit and/or veggies, liquid, and mix it up. I have also added things like:
![strawberry%20smoothie_thumb%5B1%5D[1]](https://blogger.googleusercontent.com/img/b/R29vZ2xl/AVvXsEhx1Jd2fd32nGlbBLXPhWe-H-soMNb_pZwajdtTvEwdmxVm1RfgNjA8eQEz07YpLn2xNITBJdRngSESm0ayQZNO4KdxczCCDwlFqO9F4SwTWwZQr3gF6KVij63kG7gOblIcMOohDvirq3r_/s1600-h/strawberry%20smoothie_thumb%5B1%5D%5B1%5D%5B3%5D.png "strawberry%20smoothie_thumb%5B1%5D[1]")
- oatmeal
- flax seed
- almond meal
- ice cream
- milk
- milk substitute
- juice
- yogurt
- water
If you own a Magic Bullet or something similar, I would love to hear how you use it. Do you use it for things other than smoothies? What are your favorite smoothie ingredients?
Labels: tools of the trade
May 13, 2010
Pastry Brushes: Tools of the Trade

Pastry brushes are a tool I use quite often. Originally they were made with natural bristles and then synthetic fibers. Today many pastry brushes are made with silicone. I use both old and new types.
Old Style Pastry Brush
These brushes
Silicone Pastry Brush
One thing I love about silicone brushes is how easy they are to clean. I can get them filled with olive oil, and it easily washes out. I also like that the bristles don’t fall out, and they are heat resistant. I like to brush olive oil on the crust of my pizza after it’s first bake and before I add the sauce and toppings. I’ve had old style brushes melt a little after touching the hot stoneware I use for my pizza. Silicone is a much better option in my opinion. It’s also good for brushing sauces and marinades on meat. I like silicone for wet, oily, or hot jobs.
How about you?
What style brush do you like to use, and what do you use it for?
Labels: tools of the trade
April 18, 2010
Nut Chopper: Tools of the Trade
To toast them, put whole or half nuts in a baking ban and bake at 350 degrees about 5 – 10 minutes. I usually check them after 4 minutes, shake the pan a little and put them back in for 4 minutes. Let them cool and then chop them. If you chop the nuts before hand, they will burn much too easily. Always be sure to set a time so you don’t forget about them.

When it comes to chopping nuts, I recently bought a nut chopper
If you use nuts frequently and don’t have a nut chopper, think about getting one.
A nut chopper works for me. To see what works for others check out Works for Me Wednesday.
Labels: tools of the trade
February 28, 2010
My Favorite Cooking Utensil: Tools of the Trade

It’s long. It is 13 inches long to be exact. That makes it great for using in large pots.
It’s wide. The widest part of the spoon is over 2 1/2 inches. It’s not super wide, but it’s is a nice size and can scoop up a lot of mashed potatoes.
It’s sturdy. The handle is metal and extents into the spoon itself where it fans out and gives support to the spoon.
It’s flexible. The spoon is made of silicone, and while it is strong from the metal, it is also very flexible at the edges. This allows it to be used like a spatula, and is great for scraping the sides of a pot clean.

That’s what I love about my spoon. I bought several other utensils that are the same brand. My second favorite is the ladle. I love it for all the same reasons I listed above. It is a nice big ladle and is also flexible around the edges. I like to use it to dip pancake batter and pour onto the skillet. At the end, I use it to scrape the batter from the sides of the bowl. Of course, it’s perfect for soups too.
I like the slotted spatula the least because it is too fat for getting underneath of things, and the edge of it is not straight. It does get used occasionally, though.
I wish these utensils were a brand I could find online, but since I can’t I recommend looking for something similar in the store. The flexibility is key. I do own a couple of silicone spatulas that are not nearly as flexible, and it is difficult to tell the difference in a picture.
What is your favorite cooking utensil and what do you love about it?
For more Works for Me Wednesday ideas, visit Rocks in My Dryer.
Labels: tools of the trade
January 31, 2010
Computers in the Kitchen: Tools of the Trade
Computers are not standard kitchen equipment, but these days I’m sure they are showing up in the kitchen more and more. If you like to tweet or post updates on Facebook, it can be handy to have a computer close by while you’re cooking. I like to use the computer for recipes, though. I have many of my favorite recipes printed and placed in a notebook. I also have lots of cookbooks, but often I want to try a recipe I found on the Internet, or one from my own blog that I haven’t yet printed.
The first step for me was getting a laptop. I was able to purchase one last year by using BJ’s rewards money to cover much of the cost. I really love having my own computer especially for blogging. The small netbooks would also be a great option for viewing online recipes as long as the screen is large enough for you.
 Even after getting my laptop I had a problem though. I’m a messy cook. I’m afraid that if I have a laptop on my countertop, it will end up covered with flour, or worse, some type of liquid. One day I happened upon a portable laptop stand at CVS. It was only $12 and well worth the money. While it’s not high quality, it works for me. I can easily wheel it into the kitchen and place it beside me close enough for me to read, but with enough space that it doesn’t catch flying food.
I still love cookbooks, but I also love having my computer in the kitchen. How about you?
Labels: tools of the trade
January 22, 2010
Pressure Cooking
While pressure cookers have grown in popularity, I know that many of my readers don't own one. For that reason, I try to include directions for traditionally cooking things that I cook in my pressure cooker. You might see a few pressure cooker only recipes in the future, though.
A few years ago I looked into pressure cookers and decided to put one on my Christmas wish list. My husband bought me a very nice high quality set and I have loved it! It's called the Duromatic Duo

The large 5 liter pot is what I use most. In fact, I bought a second one on eBay not long ago. It's not unusual for me to have meat in one pot and potatoes, rice or quinoa in the other. Here are some of the things I use my pressure cooker for:
Roasts
Stew
Chicken pieces - usually only if I just need to cook it so I can use it in something like chicken salad
Soups - just about any kind of soup, but split pea soup is particularly good and much faster than normal cooking
Potatoes
Rice - brown rice takes about half the time
Quinoa
Millet
You can go to the Kuhn Rikon web site to learn about the benefits of pressure cooking, but in a nutshell it is healthy, uses less energy, and is faster than conventional cooking. Pressure cookers are not cheap. Click here to see Kuhn Rikon prices on Amazon.
I used to use my crock pot a lot. So much so that I had two until recently. Since getting the pressure cooker, I have found that my crock pot gets very little use. I love being able to put a roast in the pressure cooker and have it done in an hour. The next night I make soup by throwing the leftover beef along with some veggies, potatoes or rice, maybe some beans, broth and water into the pressure cooker and cooking it for 4 minutes under pressure. My family loves the soup and we enjoy it often during cold months.
I do not cook vegetables in my pressure cooker unless they are part of a soup. They cook so quickly that I inevitably overcook them.
I should add a note that many pressure cookers with only one pressure setting give instructions not to cook rice and split pea soup in the pressure cooker. The Kuhn Rikon pots have a high and low presser indicator. Their instructions say that these foods can be cooked under low pressure.
I cook split pea soup for 20 minutes and it turns out great. In fact, I didn't even like it until I made it in the pressure cooker. I first made it as a treat for my husband since he did give me the pots. It smelled so good I had to try it and I've been eating it ever since!
Labels: homemaking tips, tools of the trade
September 3, 2009
The Zester – Tools of the Trade
![clip_image002[8]](https://blogger.googleusercontent.com/img/b/R29vZ2xl/AVvXsEiv8kwJnx2lZNiD9Vftz_zIQt5wlIkDjwgsm7ZQSlSe49v4G9XtKv_Z9f2cEtWjnxhZHB_9eVILcvaEhHByvbHPM1_VuJWe39pEdBNtS8w41pZdSL3ya0-tiB73buk1r9hq-v-BFyN29B9n/s1600-h/clip_image002%5B8%5D%5B3%5D.gif "clip_image002[8]")
I used to just omit the zest, but then I started trying to use it a little. It adds so much flavor if you get it right. At first I tried making zest with a grater or a peeler, but it never worked very well. Finally, I bought a zester, and I’m so glad I did. This little tool does the job perfectly. It scrapes off just the right depth of skin and gives you little stringy bits of zest.
If you like lemon or other citrus flavor in your food, a zester if the tool for you. Look for one where kitchen gadgets are sold, or purchase one online.
Labels: tools of the trade
August 17, 2009
Recipe Organization

I decided to try using Microsoft Access database. I had used a more simple database before, and since I had Access on my computer, I decided to use it. I have to admit, it wasn’t easy to learn, and I only learned what was necessary to accomplish what I wanted. In the end, though, I was happy with the results.
1. I created a form in Access that I use to enter new recipes. It allows me to create categories and subcategories that I use for sorting the recipes. I have drop down options for several things such as the categories and oven temperature.
2. I created a report which is used for printing the recipes. I opted to print them on half a page so I could print two per 8 1/2 x 11 sheet of paper.
3. I bought two binders at an office supply store that hold 5 1/2 x 8 1/2 sheets of paper. One binder holds only dessert recipes, the other holds all remaining recipes which are divided with tab pages.
4. I used the database to create a table of contents for each book. It is particularly helpful when I want to look over my recipes and decide what to make for dinner, or dessert.
I’ve used this system for several years now and I’m very happy with it. Periodically, I type up new recipes that I’ve created or found on the Internet. I included a place on my form for recipe source so I can remember where recipes came from.
If you’re looking for a way to organize recipes, this is a great one. The drawback is learning to use the database. If you don’t know how already, see if you can find a friend who does or get a book from the library. I’ve already forgotten much of what I learned when I set it up.
How do you store your recipes?
Labels: tools of the trade
July 28, 2009
Storing the Little Ingredients
Since I do most of my gluten-free baking from scratch (gluten free is the only kind of baking I do), I like to have my baking ingredients organized and easy to find. A number of months ago I decided I needed to do something different with all the “little” ingredients. You know, things like baking powder, xanthan gum, and salt.
I’m lucky enough to have an Ikea in the area and one day while browsing there I decided to try using magnetic containers stored on a metal strip. The problem was that the containers weren’t meant for that purpose. They had twist on lids which didn’t twist on or off very well, and the containers were shallow, making it difficult to get your measuring spoon filled up. However, I bought the things so I kept using them.
Then recently, I saw some new magnetic containers at BJ’s (I’ve also seen them at Bed Bath & Beyond). I bought a set of four with my fingers crossed. They worked so well I bought another set. Eight containers fit just perfectly on my metal strip from Ikea. Now my little ingredients look like this:


I also used a label maker I received for Christmas to put labels on the side of each container. I placed them so they are centered over the area where the hole is. That way, when I put the container back on the strip, I simply make sure the label is facing up and I know the hole if facing up also. The eight ingredients I chose to use are:
- baking powder
- baking soda
- cinnamon
- gelatin (used in some gluten-free breads)
- guar gum
- salt
- sugar
- xanthan gum
The reason I included sugar is that when making breads, I only use a little to activate the yeast. Also, I do not use a sugar jar so it could be used for sprinkling into coffee or tea.
Obviously, I have to store packages of these ingredients elsewhere, but they can be tucked away in an inconvenient place and brought out for refilling. Do you have a method you use for easy access to little ingredients?
For more helpful ideas visit We Are THAT Family.
Labels: tools of the trade
June 4, 2009
Tools of the Trade – The Food Processor
How I Came to Buy a Food Processor
For many years I did not own a food processor and had no desire to. Probably because my mom never had one, I didn’t think they were necessary or even very useful. I did know they took up a lot of space.
My interest in this small appliance grew with time, and eventually I decided to borrow one from a friend. I came to the conclusion that a food processor is indeed useful, but I still didn’t have the space for it.
I started looking at them in stores and found a KitchenAid model, similar to this, that was smaller than most, but not tiny. (7-cup versus 12-cup) It was just what I wanted.
How I Use My Food Processor
Grating – When I was a kid, my mom would give me the job of grating food. I hated it. It was slow, unpleasant work. Using a food processor it just the opposite. It is so fast, it’s fun to watch! I grate carrots for salads and cakes, zucchini for bread and muffins, and hard cheeses.
Chopping – I use it to chop nuts for baking (or any other reason), vegetables (sometimes), and cooked meat.
Milling – I don’t know what else to call it. I turn oatmeal into coarse flour for smoothies. I have even used it when I was out of powdered sugar by processing white granulated sugar until powdery.
Pureeing – Just about anything that needs to be pureed. If it’s very runny, though, the blender is better.
How I Clean My Food Processor
The parts are dishwasher safe, but sometimes I wash it by hand. One of the advantages to the smaller model is that it not only takes up less space on your counter or in your cabinet, it also takes up less space in the dishwasher. If there is room for it, I put it in.
I would like to hear from you. I’m sure I left out many uses for a food processor. How do you use yours? For people who are considering buying one, what brand and model do you have and how do you like it?
Labels: tools of the trade
May 21, 2009
Tools of the Trade – The Stand Mixer
When I was diagnosed with celiac disease, I found several Bette Hagman cookbooks at the library. I didn’t have to read long to realize I needed a heavy duty stand mixer. All I had at the time was a good hand mixer. Mom to the rescue! Yes, my mom traded her KitchenAid mixer for my hand mixer (hardly a fair swap, but that’s how moms are).
I know some of you are thinking about how that stand mixer was used to mix wheat batters and doughs. That’s where my dad comes into the picture. He carefully and thoroughly cleaned the mixer. I recall the use of toothpicks to get into tight places. I was very sensitive to gluten at the time, and I never reacted to anything made with the mixer, so he must of done a great job.
If you are new to the gluten-free diet (and plan on baking), you might be wondering why a stand mixer is necessary. I find it invaluable for two reasons:
1. Gluten-free bread dough is not kneaded like wheat dough, but it does need to be mixed very well. A stand mixer does the job best.
2. A stand mixer can handle greater quantity than a hand mixer. Gluten-free dough is much thinner than a wheat dough. While a hand mixer might handle mixing it, the amount of dough can be too much for the beater size.
The Big Question: What Mixer Do I Buy?
I’m no expert, but from what I have read, KitchenAid is the most highly recommended. They are expensive but they last for years and years. That still leaves you with many choices, though. KitchenAid stand mixers range in size and power as well as price. Carol Fenster uses a lower end 4.5 quart model that she is happy with.
I have considered replacing my mixer which has a handle to lift the bowl. I think I would like a tilt head model better because I find it difficult to scrape the bowl. I would love to have input from my readers about what you use and like.
Labels: tools of the trade
![]()
Subscribe to Posts [Atom]
