February 14, 2011
Chocolate Chip Oatmeal Cookies
 Happy Valentine’s Day!
Valentine’s Day is not a big event at our house this year. My teenage boys are not particularly into getting valentines from mom and dad anymore, and my husband and I have had enough Valentine’s together that we don’t feel the need to spend money in order to say “I love you.” We express our love to each other all the time. I know, it’s not romantic, but this year we’re not giving cards or flowers, or other gifts. We’ll spend time together, have a nice salmon dinner, and enjoy a homemade treat. I plan on making raw brownies. Something like this or this.
I do love my readers, but I don’t tell you that every day. I apologize for not having a great chocolaty treat recipe for you or even a round up of recipes. I do have a Rudi’s bread giveaway going on and there will be another giveaway posted tomorrow, so be sure to check back.
These cookies contain chocolate chips. Maybe that makes them Valentine’s Day worthy. If not, they are great for every other day of the year. They are thick cookies, but not necessarily chewy. They still have a crunch to them. I personally love oats in my chocolate chip cookies. I love the flavor and texture as well as the added nutrition.
So here’s my sort of Valentine’s recipe for all my dearly loved blog readers!

Chocolate Chip Oatmeal Cookies (Gluten & Dairy Free)
Preheat oven to 375°- 1/2 c. brown rice flour
- 1/2 c. millet flour
- 3/4 c. potato starch
- 1 tsp. baking soda
- 1/2 tsp. salt
- 3/4 tsp. xanthan gum
- 1/2 c. brown sugar
- 1/2 c. white sugar
- 1/2 c. (1 stick) Earth Balance buttery sticks (or butter)
- 1/2 c. Spectrum organic shortening
- 2 eggs
- 2 tsp. vanilla
- 2 1/2 c. gluten-free oats
- 2 c. chocolate chips (I used dairy free Ghirardelli Chips)

Drop spoonfuls of dough onto ungreased baking sheets. Bake at 375° for 10-12 minutes. Cool for a minute on the pan, then transfer to a wire rack to cool completely.
View Printable Recipe
Labels: cookies/bars, dessert recipes

January 10, 2011
Nutty Apricot Balls

This month, Lauren of Celiac Teen is hosting Go Ahead Honey, It’s Gluten Free. Her theme is Follow the Calendar, which gives you lots of choices. When I looked over this list of January Food Holidays, and saw that January 9th was National Apricot Day, I knew I had to make an apricot recipe. You see, I had a bag of dried apricots in my pantry that I had been meaning to use for several months, but it just hadn’t happened. This was the motivation I needed.

I did a little recipe searching and decided to modify this very simple recipe for Apricot Balls. The biggest challenge was making it dairy free since the recipe calls for sweetened condensed milk. I figured all that was really needed was something sweet, thick, and sticky, and so I decided on honey. I also added a little bit of pecans to the balls and chose to roll the balls in pecans. I like the flavor and protein they add. I used sweetened coconut for this, but you could use unsweetened. You might want to taste test and consider adding a little sweetener of choice because the apricots can be a bit tart.
The apricots are definitely the strongest flavor in these slightly sweet treats. One small ball packs plenty of flavor and chew which means that eating only one or two is satisfying. I like that.
A food processor is the best choice for making these. If you don’t have one, you could try other methods, but I’m not sure how well they will work.
I haven’t tried this recipe with other dried fruit, but I bet it would be good. It might be fun to try different fruit and nut flavors. What do you think?

Nutty Apricot Balls
- 8 oz. dried apricots (unsweetened)
- 1 c. sweetened flaked coconut
- 1/4 c. + 1/3 c. pecan halves
- 1/4 c. honey

Place the dried apricots, coconut, and 1/4 cup pecan halves in the food processor. Process until finely chopped and combined well. Add the honey and process until it is evenly distributed. Place the mixture in a bowl, cover, and refrigerate about 30 – 60 minutes until chilled through.

Use a spoon to scoop up a small amount of the mixture. Press it together with your hands and form a small ball 1 – 1 1/2 inches in diameter. Roll the ball in the finely ground nuts. Place on a serving plate or in a container. Store in the refrigerator until ready to eat.
View Printable Recipe
This post is linked to the following food carnivals. The recipes you will find there are not necessarily gluten free, but many of them are or can be easily adapted.
Labels: dessert recipes, fruit desserts, Go Ahead Honey
December 20, 2010
Gluten-Free Gingerbread House
This is a guest post from Gina who blogs at Chronicles of a Canadian Twentysomething.
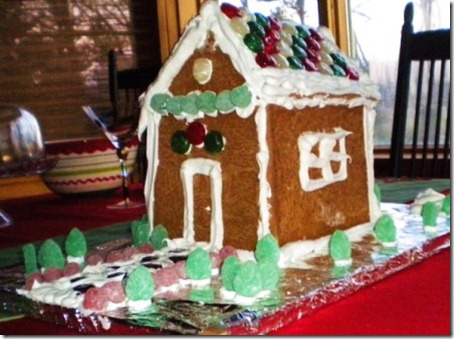
As a kid, I was never interested in learning to bake or cook, but 3 years ago I found out that I have to avoid gluten. At first, figuring out how to make things from scratch was purely a survival technique, but it quickly became a passion and sharing it with others is a huge part of the joy.
So this year while I’m home, I’m cooking dinner for my parents and doing the holiday baking. The first project to tackle: a gingerbread house. We’ve never made one as a family (since I was an infant) and never from scratch, so this is completely new to us. However...it worked! I’m very pleased and I hope you will be too! It takes a couple of days and at times it’s a 2-3 person job, but definitely worth the effort. I’ve never laughed so hard in my life.
Did you know Ziploc bags of icing can demonstrate some degree of flatulence? Ma n’ I had tears running down our faces. Sigh.
I used the techniques and base recipe of Hillbilly Housewife, with the purpose of seeing if it would convert to gluten-free, without crumbling.
Cream together:
1 cup butter (or 3/4 cup Shortening for dairy-free)
2 cups brown sugar
1 cup white sugar
(use a mixer, unless you’ve got Hulk-like biceps).
Add:
2-3 Tbsp molasses
6 eggs
Mix on low speed until combined.
Add:
6-7 cups Bob’s Red Mill All-Purpose flour
(You can use your own GF mix but for those who don’t have many different flours, this works too!)
2 tsp baking soda
1 ½ tsp guar gum
1 Tbsp ground ginger
1 Tbsp ground cinnamon
1 Tbsp ground nutmeg
Mix until combined. The flour will be VERY sticky with 6 cups of flour, so add a little more. Sprinkle a LOT of flour on your counter/cutting board and make sure the dough is coated before kneading. Another person adding flour when needed is helpful. Knead until smooth and fingertips should leave indentations in the dough when pressed. Place in a bowl and cover overnight.

The next day, after cutting pieces of paper to your desired measurements for the house, roll out dough (again, you’ll need more flour), and use the paper to trace and cut pieces of dough (we used a pizza cutter, very easy). We cut out the square end-pieces and roof peaks separately. However, while “gluing” the pieces together, I thought it might be a lot easier to make the ends all one piece (wall + peak). If you try that method, I’d love to hear how it turned out!
Grease and flour (even non-stick) cookie sheets and carefully transfer cut-out pieces. Bake at 325F for 15-20 minutes.
*If you’re making ginger-snaps with leftover dough, turn heat up to 350F and reduce the time. Cool separately on wire racks (overnight or until firm...we couldn’t wait so we glued them after about 8 hrs).

For the icing: use 3 egg whites, 1 ½ tsp cream of tartar and 4 ½ cups powdered sugar. Beat until stiff.
We had to make 2 batches (1 for gluing house + licking, 1 for decorations + licking).
If you have kids...make extra. ; )
Scoop into a Ziploc bag with a hole snipped in one corner (make sure it’s sealed otherwise!) and pipe icing out onto gingerbread edges. This is another point where you’ll need extra hands. : )
Leave to dry and then decorate!
This recipe worked GREAT with gluten-free flour, and I will definitely feel comfortable using other combinations of flour now that I know how it should look. If you work with a kitchen scale (I hope to have one soon!), this mix is 136 g/cup. So as long as the mix you use works out to that weight per cup, you should be alright! : )
*If you want to use this dough JUST for gingersnaps, you may want to reduce the baking soda (they puffed up too much) and add another Tbsp of cinnamon (and take out the nutmeg if you wish). Roll the dough into 2” x 1.5” loaves and keep refrigerated until firm. Cut into slices with a sharp knife and bake!
Thanks Linda for letting me share my gingerbread adventure with your readers! Merry Christmas and Happy Holidays! : )

As a kid, I was never interested in learning to bake or cook, but 3 years ago I found out that I have to avoid gluten. At first, figuring out how to make things from scratch was purely a survival technique, but it quickly became a passion and sharing it with others is a huge part of the joy.
So this year while I’m home, I’m cooking dinner for my parents and doing the holiday baking. The first project to tackle: a gingerbread house. We’ve never made one as a family (since I was an infant) and never from scratch, so this is completely new to us. However...it worked! I’m very pleased and I hope you will be too! It takes a couple of days and at times it’s a 2-3 person job, but definitely worth the effort. I’ve never laughed so hard in my life.
Did you know Ziploc bags of icing can demonstrate some degree of flatulence? Ma n’ I had tears running down our faces. Sigh.
I used the techniques and base recipe of Hillbilly Housewife, with the purpose of seeing if it would convert to gluten-free, without crumbling.
Gina’s Gluten-Free Gingerbread House
To make the gingerbread dough:Cream together:
1 cup butter (or 3/4 cup Shortening for dairy-free)
2 cups brown sugar
1 cup white sugar
(use a mixer, unless you’ve got Hulk-like biceps).
Add:
2-3 Tbsp molasses
6 eggs
Mix on low speed until combined.
Add:
6-7 cups Bob’s Red Mill All-Purpose flour
(You can use your own GF mix but for those who don’t have many different flours, this works too!)
2 tsp baking soda
1 ½ tsp guar gum
1 Tbsp ground ginger
1 Tbsp ground cinnamon
1 Tbsp ground nutmeg
Mix until combined. The flour will be VERY sticky with 6 cups of flour, so add a little more. Sprinkle a LOT of flour on your counter/cutting board and make sure the dough is coated before kneading. Another person adding flour when needed is helpful. Knead until smooth and fingertips should leave indentations in the dough when pressed. Place in a bowl and cover overnight.

The next day, after cutting pieces of paper to your desired measurements for the house, roll out dough (again, you’ll need more flour), and use the paper to trace and cut pieces of dough (we used a pizza cutter, very easy). We cut out the square end-pieces and roof peaks separately. However, while “gluing” the pieces together, I thought it might be a lot easier to make the ends all one piece (wall + peak). If you try that method, I’d love to hear how it turned out!
Grease and flour (even non-stick) cookie sheets and carefully transfer cut-out pieces. Bake at 325F for 15-20 minutes.
*If you’re making ginger-snaps with leftover dough, turn heat up to 350F and reduce the time. Cool separately on wire racks (overnight or until firm...we couldn’t wait so we glued them after about 8 hrs).

For the icing: use 3 egg whites, 1 ½ tsp cream of tartar and 4 ½ cups powdered sugar. Beat until stiff.
We had to make 2 batches (1 for gluing house + licking, 1 for decorations + licking).
If you have kids...make extra. ; )
Scoop into a Ziploc bag with a hole snipped in one corner (make sure it’s sealed otherwise!) and pipe icing out onto gingerbread edges. This is another point where you’ll need extra hands. : )
Leave to dry and then decorate!
This recipe worked GREAT with gluten-free flour, and I will definitely feel comfortable using other combinations of flour now that I know how it should look. If you work with a kitchen scale (I hope to have one soon!), this mix is 136 g/cup. So as long as the mix you use works out to that weight per cup, you should be alright! : )
*If you want to use this dough JUST for gingersnaps, you may want to reduce the baking soda (they puffed up too much) and add another Tbsp of cinnamon (and take out the nutmeg if you wish). Roll the dough into 2” x 1.5” loaves and keep refrigerated until firm. Cut into slices with a sharp knife and bake!
Thanks Linda for letting me share my gingerbread adventure with your readers! Merry Christmas and Happy Holidays! : )
Gina is the author of Chronicles of a Canadian Twentysomething. Aside from singing in a choir and working in a plant science lab, she is currently studying to become a Registered Dietician in Montreal, Quebec. Her dream (aside from dietary counseling), is to someday own and operate a gluten-free/allergen-free bakery. Until then, she enjoys learning new techniques and coming up with recipes in her spare time.
Labels: dessert recipes
Sugar Cookies

Sugar cookies are quite popular this time of year. They are not my favorite cookie, but they are fun to make and I know that many people are looking for a gluten-free recipe. And since this month’s challenge is to make a gluten-free cookie, I thought I might as well try a gluten and dairy free version of these favorites.
The recipe I started with is a gluten-free recipe, but I don’t know where it came from. Usually I make notes on recipes as to whether I got them from a cookbook or an Internet site, but this one did have any information. Let me know if you recognize it, though I have made a couple of changes.
I had made these cookies before with success which is why I still had the recipe. It has one ingredient you don’t see very often, though—potato flour. Not potato starch. There is a big difference and the two are not interchangeable. The dough in this recipe is very easy to work with, and I like the fact that the cookies hold their shape well. This is not the kind of sugar cookie that puffs up and turns out soft. These are nice and crisp. They are also not very sweet, which is common with sugar cookies, despite their name. That is because many people like to put colored frosting and decorations on the cookies which adds sweetness to them. I only used sprinkles on these and was reminded once again that the red sprinkles I have always turn pink.
Gluten-Free Cut-Out Sugar Cookies
- 1/4 c. Spectrum organic shortening (or butter)
- 1/4 c. coconut oil (or butter)
- 3/4 c. sugar
- 1 egg
- 1/2 tsp. vanilla or almond extract
- 1 Tb. milk (I used almond milk)
- 1 c. rice flour
- 1/2 c. potato flour (not potato starch)
- 1/2 tsp. baking powder
- 1/4 tsp. xanthan gum
Preheat oven to 350°.
 Divide the dough in half and place on a pastry mat or silicone baking mat. Cover it with a piece of plastic wrap and roll to about 1/8 inch thickness. Use cookie cutters to cut out dough shapes. Use a spatula to transfer the dough to an ungreased cookie sheet. Decorate with sprinkles if desired. Bake at 350° for 5 – 8 minutes (depending on thickness). Keep a close eye on them because the edges will brown quickly. Makes about 30 two inch cookies.
View Printable Recipe
Labels: cookies/bars, dessert recipes
December 13, 2010
Thumbprint Cookies

When it comes to food, some people are naturally adventuresome and some are not. My husband is not. In fact, when he was still in a high chair his mom gave him a piece of toast with jelly on it. He was familiar with toast, but not with jelly. He didn’t like the look of it and immediately threw it on the floor. Subsequent attempts to get him to try jelly were unsuccessful. To this day he has not eaten jelly, nor has he eaten many things that are jelly like. A few years ago he did try huckleberry pie (the pie filling had always looked to jelly-like), and he enjoyed it so much he was sorry he hadn’t tried it sooner. However, it didn’t produce much change in the whole jelly eating area. I’m fine with that. It’s not like jelly is a health food.
One of my favorite cookies before going gluten-free was the jelly-topped thumbprint cookie. Maybe because of my husband’s aversion to jelly, I don’t think I have ever tried a gluten-free version. I decided that this year I would give it a go as part of this month’s make a gluten-free cookie challenge. Of course, I also needed to make the cookie dairy free.
Here’s what I did: I started with a basic Betty Crocker recipe, because I think that’s the one I used before going gluten free. The recipe called for shortening and margarine. I used the healthier fat versions that I prefer (see recipe). The recipe called for 1 cup flour. I started with 1/2 cup sorghum flour and 1/2 cup potato starch. I also added 1/4 teaspoon xanthan gum. After mixing the dough, it was too sticky to work with, and so I added and additional 1/4 cup potato starch. That made a good texture. I think sorghum can make dough a bit sticky so a different flour may have worked better. I just thought the flavor would be nice for these cookies.
Problems: The cookies rose enough when they baked that the thumbprint almost disappeared. I had to press the centers again as soon as I removed them from the oven. That worked fine. Also, the first cookie I tried was very fragile. I thought I would need to increase the xanthan gum the next time, but I learned that they are fine after cooling completely. I just need to be patient.
How they turned out: They were very good. I enjoy the flavor combination of walnuts and concord grape jelly. You could, of course, vary the nuts and the jelly. The cookie was light with a nice texture. I’ll definitely make these again.

Gluten-Free Thumbprint Cookies (Dairy Free)
Preheat oven to 350°- 1/4 c. packed brown sugar
- 1/4 c. shortening (I used Spectrum palm oil)
- 1/4 c. margarine or butter (I used Earth Balance sticks)
- 1/2 tsp. vanilla
- 1 egg, separated
- 1/2 c. sorghum flour
- 3/4 c. potato starch
- 1/4 tsp. salt
- 1/4 tsp. xanthan gum
- 1 c. finely chopped walnuts
Lightly beat the egg white in a bowl. Place the chopped walnuts in another bowl. Roll the dough into balls about 1 1/2 inch in diameter. Coat each ball with egg white, then nuts. Reshape the ball with your hand, pressing the nuts in slightly. Place balls on an ungreased cookie sheet about 1 1/2 inches apart. Press your thumb into the center of each ball. You want to make a deep impression, but you don’t need to press all the way to the cookie sheet.

Bake at 350° for about 10 minutes. Remove from the oven and use your thumb (be careful!) or the back of a spoon or small scoop to press the middles again. The indentation does not need to be very deep. Immediately remove to a wire rack and cool completely. Place a small amount of jelly in the center of each cookie before serving. Makes about 2 dozen.
View Printable Recipe
This post is linked to Slightly Indulgent Tuesdays.
Labels: cookies/bars, dessert recipes
December 7, 2010
Brown Rice Syrup Toffee
This guest post is by Alea Milham of Premeditated Leftovers and Gluten-Free Flavor Full!
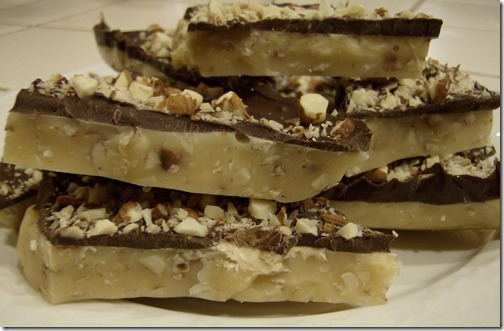
Holiday parties can be difficult to navigate when you have Celiac’s Disease, but I have a confession; this is the time of year when I am most thankful for my gluten intolerance! I have the perfect excuse to politely refuse my aunt’s fruit cake, my mother-in-law’s rum cake, and neighbor’s date cookies. I realize you may have enjoyed these items and now miss them, but I don’t! Prior to being diagnosed, I used to politely choke down a few bites, but now I don’t have to. :) And since I am not wasting calories on items that I don’t enjoy, I have more leeway to partake of the ones I do: candies. I love fudge, divinity, and toffee and because there is a God in heaven, they are all naturally gluten free.
My kids prefer my traditional toffee, but as I have gotten older I have begun to find it a little too sweet. I discovered that brown rice syrup can be easily be substituted for refined sugar to make brittles and toffee. The only changes that need to be made is to eliminate the water in the recipe and stir the butter and syrup mixture regularly while boiling it.
In a large sauce pot, melt butter over a medium heat. Add brown rice syrup and attach a candy thermometer to pot.
Raise heat to medium high and stir constantly until the mixture reaches 270 degrees on the candy thermometer.
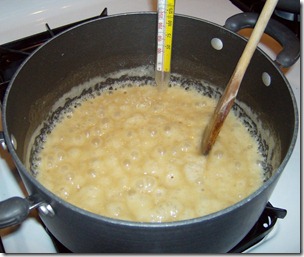
Remove from heat and stir in 1/2 cup chopped almonds. Pour into the foil lined pan and allow to cool.
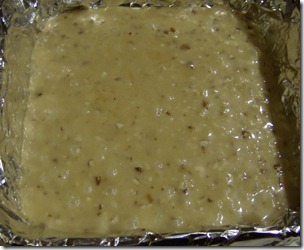
You could stop right here if you like or you can proceed and add chocolate and more nuts…
Melt chocolate in a double boiler. Spread over the top of the toffee. Sprinkle 1/4 cup of chopped almonds over the chocolate.

Place in the refrigerator to cool. Once the toffee and chocolate has cooled completely break it into pieces.
What are your favorite gluten-free holiday foods?

Holiday parties can be difficult to navigate when you have Celiac’s Disease, but I have a confession; this is the time of year when I am most thankful for my gluten intolerance! I have the perfect excuse to politely refuse my aunt’s fruit cake, my mother-in-law’s rum cake, and neighbor’s date cookies. I realize you may have enjoyed these items and now miss them, but I don’t! Prior to being diagnosed, I used to politely choke down a few bites, but now I don’t have to. :) And since I am not wasting calories on items that I don’t enjoy, I have more leeway to partake of the ones I do: candies. I love fudge, divinity, and toffee and because there is a God in heaven, they are all naturally gluten free.
My kids prefer my traditional toffee, but as I have gotten older I have begun to find it a little too sweet. I discovered that brown rice syrup can be easily be substituted for refined sugar to make brittles and toffee. The only changes that need to be made is to eliminate the water in the recipe and stir the butter and syrup mixture regularly while boiling it.
Brown Rice Syrup Toffee
- 1 cup unsalted butter
- 1 cup brown rice syrup
- 1/2 cup chopped almonds
- 6 oz. dark chocolate
- 1/4 cup chopped almonds
In a large sauce pot, melt butter over a medium heat. Add brown rice syrup and attach a candy thermometer to pot.
Raise heat to medium high and stir constantly until the mixture reaches 270 degrees on the candy thermometer.

Remove from heat and stir in 1/2 cup chopped almonds. Pour into the foil lined pan and allow to cool.

You could stop right here if you like or you can proceed and add chocolate and more nuts…
Melt chocolate in a double boiler. Spread over the top of the toffee. Sprinkle 1/4 cup of chopped almonds over the chocolate.

Place in the refrigerator to cool. Once the toffee and chocolate has cooled completely break it into pieces.
What are your favorite gluten-free holiday foods?
Alea Milham shares her tips for saving money and time while reducing waste in her home at Premeditated Leftovers. Since 3 out of 5 in her household are gluten intolerant, she has declared majority rule, and made her home a gluten-free zone. She shares gluten-free recipes at Gluten-Free Flavor Full.

Labels: dessert recipes
November 12, 2010
Pumpkin Pie - Gluten & Dairy Free

I avoided making pies for many years, but last year was a breakthrough for me. I learned to make gluten-free pie crust and fresh pumpkin puree. I shared my gluten-free pumpkin pie last Thanksgiving, and everyone loved it.
This fall when I went dairy free, pumpkin pie was one of the first things I thought about missing. For some reason I thought it would be really difficult to replace the evaporated milk in the pie and the butter in the crust. How silly of me.
The other night we had a very early dinner, so afterwards the kids asked if I could make a dessert for later. I responded with, “I could make a pie.” You should have seen their eyes light up! When I told them I had a pie pumpkin that I needed to use, they weren’t as excited. Pumpkin pie wasn’t their first choice, but it was all I had to work with. Plus the fact that I had been wanting to try a dairy free version.
First, I needed a dairy free pie crust. I could have used my gluten-free pastry dough recipe that I recently used for a breakfast pie. It worked well dairy free, but I really wanted to try my first pie crust recipe. When I started making it, I realized it calls for a little bit of millet flour. I didn’t have any on hand, so I decided to use sorghum flour instead. In place of the butter I used Spectrum organic shortening (non hydrogenated palm oil). The crust was pretty good, but the sorghum flour made it drier and more crumbly. Next time, I’ll definitely go back to using millet flour.
Next, I needed a substitute for evaporated milk in the pie filling. I thought coconut milk would work well, but my pickiest son thought I should use almond milk. He doesn’t dislike coconut milk, but he doesn’t like coconut flavor in just anything, and he would be able to taste it. The original recipe called for 1 cup evaporated milk, but I only used 3/4 cup almond milk. Instead, I used 1/4 more pumpkin puree. Otherwise, everything was the same.
The pie baked beautifully. This time I put foil on the edge of the crust to keep it from browning too much. The result was a very delicious pie that we finished off in one evening. In fact, the kids who were not so thrilled with pumpkin pie both commented on how good the pie actually was. I think they forgot how much better pumpkin pie is when made with fresh pumpkin puree.

Gluten Free & Dairy Free Pumpkin Pie
- 1 pie crust recipe
- 1 3/4 c. pumpkin puree or canned pumpkin
- 3/4 c. sugar
- 2 eggs
- 3/4 c. almond milk
- 1/2 tsp. vanilla
- 1/2 tsp. salt
- 1/2 tsp. cinnamon
- 1 1/2 tsp. pumpkin pie spice
Combine all the ingredients using a fork to mix them together.
Roll and press the pie dough into a 9 or 10 inch pie plate. Add the filling to the unbaked pie crust. Bake at 400 degrees 45-55 minutes (longer for a 9 inch pie).
Cover the crust with foil or a pie shield after about 30 minutes. You can use foil by cutting a large round hole in the center of a piece of foil and placing it over the pie, loosely forming it to the sides of the pie dish.
Let cool (at least mostly) before cutting.
View Printable Recipe
For more great cinnamon recipes visit Friday Foodie Fix at The W.H.O.L.E. Gang. This post is also a part of Slightly Indulgent Tuesdays where you will find many (but not all) gluten-free recipes.
Labels: dessert recipes, pies/pastry
November 5, 2010
Pumpkin Sheet Cake (gluten, dairy, & soy free)

You’ll notice there’s no icing on the cake. You could add a frosting of choice or make a glaze to drizzle over top. A little powdered sugar, milk substitute, and maple syrup would go nicely with this. We like it just the way it is, though.
Gluten-Free Pumpkin Sheet Cake (also dairy & soy free)
Preheat oven to 350°- 3/4 c. Spectrum organic shortening (or butter (dairy) or Earth Balance sticks (soy))
- 1 3/4 c. packed brown sugar
- 2 large eggs
- 1 tsp. vanilla
- 3/4 c. sorghum flour
- 1/2 c. millet flour
- 1/2 c. potato starch
- 1/4 c. tapioca starch
- 1 tsp. baking powder
- 1/2 tsp. baking soda
- 1 tsp. xanthan gum
- 1/2 tsp. salt
- 1 tsp. cinnamon
- 1/4 tsp. ginger
- 1 c. canned pumpkin (or pumpkin puree)
- 1 c. shredded coconut (I used sweetened)
- 1/2 c. chopped toasted pecans*
Spread in the bottom of a greased 11 x 15 inch jelly roll pan. Bake at 350° for 25 minutes or until a tester comes out clean. Cool before cutting.
*Toasting nuts brings out their flavor. Before chopping, place them in a pan (I use a cake pan) and put in a 350° oven about 5 minutes. Be careful not to leave them too long as they will burn quickly.
View Printable Recipe
Labels: cake, dessert recipes
October 18, 2010
Coconut Milk Custard
This is a guest post from Lynn, a friend who I met at the Blissdom blog conference in February. Lynn lives in Oklahoma with her husband and three children. She loves to cook and try new recipes. She blogs at Lynn's Kitchen Adventures, sharing recipes, tips, and ideas to help you meld a love of cooking with a busy life. Lynn started on her gluten free journey in October of 2009. In January of 2010 her daughter was diagnosed with a tree nut, peanut, sesame allergy. Because of these challenges, Lynn started the blog Lynn's Recipe Adventures, she uses it to share recipes and ideas for those dealing with food allergies and issues.

I love to bake and experiment with my recipes, but I don’t always have the time to spend on gluten free baking. That is why I love to make recipes that are naturally gluten free. You know that kind of recipes that do not contain 10 or more ingredients or a bunch of gluten free flours. Do not get me wrong, I love to make a good gluten free cookie, but some days I just need something more basic.
Custard is just that. It is an old fashioned, frugal, and simple dessert that is naturally gluten free. Over the last year I have experimented quite a lot with custard coming up with different versions that my family enjoys.
Today’s recipe is my most recent adaptation of custard. The coconut milk in it, not only makes it dairy free, but gives it a nice depth of flavor. It adds a little something extra to simple custard. I will say though that using coconut milk in this makes it much richer than your normal custard. So, a little bit is really all you need, but if you are like me, it is a bit hard to stop eating at just a little. It was that good.

I love to bake and experiment with my recipes, but I don’t always have the time to spend on gluten free baking. That is why I love to make recipes that are naturally gluten free. You know that kind of recipes that do not contain 10 or more ingredients or a bunch of gluten free flours. Do not get me wrong, I love to make a good gluten free cookie, but some days I just need something more basic.
Custard is just that. It is an old fashioned, frugal, and simple dessert that is naturally gluten free. Over the last year I have experimented quite a lot with custard coming up with different versions that my family enjoys.
Today’s recipe is my most recent adaptation of custard. The coconut milk in it, not only makes it dairy free, but gives it a nice depth of flavor. It adds a little something extra to simple custard. I will say though that using coconut milk in this makes it much richer than your normal custard. So, a little bit is really all you need, but if you are like me, it is a bit hard to stop eating at just a little. It was that good.
Coconut Milk Custard
- 4 eggs
- 2/3 cup sugar
- 1/2 teaspoon salt
- 1/4 teaspoon ground cinnamon
- 3 teaspoons vanilla extract
- 3 cups coconut milk ( I use one of the lower fat ones)
Labels: dessert recipes
September 19, 2010
Gluten Free, Dairy Free, Soy Free
I think I mentioned recently that I’m back to eating dairy free. I’m also mostly soy free. The reason for these additional diet restrictions is related to my thyroid problems. I will probably write a post about that at a later date after I’ve seen what effect it has.
It’s been hot since these diet changes, and so I’m just now getting around to trying my hand a baking. I thought it would be a good time to remind you that many recipes can easily be made dairy free and soy free by substituting. Soy is often used in dairy substitutes, so it can be a bit challenging. I have been using Spectrum organic palm oil shortening which is not hydrogenated. I found a soy free version of Earth Balance spread, but not the sticks, so I haven’t tried that.
I recently made my favorite gluten-free chocolate chip cookies using the Spectrum shortening and Ghirardelli chocolate chips which are dairy free but contain soy lecithin. I didn’t change anything about the recipe except to replace the butter with shortening. They turned out great!

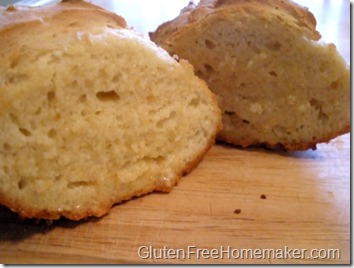
A few of my favorite bread recipes are naturally dairy free including my wonderful French bread which I made the other night for dinner. I used millet flour in place of sorghum and loved the bread even more than before. How I wish I had taken a picture of it. It rose so nicely, and my husband said, “This is just like regular bread.” Here’s a picture of the bread made with sorghum:
I also like making that recipe as French bread rolls, but with more whole grain and less starch. This version uses sorghum and millet.

Then there’s my favorite focaccia bread and hamburger buns recipe that uses olive oil and water.
![hamburberbun_thumb8[1]](https://blogger.googleusercontent.com/img/b/R29vZ2xl/AVvXsEhdbSKKKwlLLUhrHBzhZyVu-QtB0s4qfjfzYshpD9kp3Ataq7j_BkZEqzgMB2HO7Mq-vGcI_01LEQaQa0Z2_OYbF2SrVDx8vVZmw2p2C3Q40g1u8j-1-uble1AkSqDeWhapJ67pBwzgkVBz/?imgmax=800 "hamburberbun_thumb8[1]")
If you haven’t tried these recipes, yet, all of them are favorites in this house. I think you will enjoy them, and there is no need to apologize for the fact that they are gluten free, dairy free, and soy free.
It’s been hot since these diet changes, and so I’m just now getting around to trying my hand a baking. I thought it would be a good time to remind you that many recipes can easily be made dairy free and soy free by substituting. Soy is often used in dairy substitutes, so it can be a bit challenging. I have been using Spectrum organic palm oil shortening which is not hydrogenated. I found a soy free version of Earth Balance spread, but not the sticks, so I haven’t tried that.
I recently made my favorite gluten-free chocolate chip cookies using the Spectrum shortening and Ghirardelli chocolate chips which are dairy free but contain soy lecithin. I didn’t change anything about the recipe except to replace the butter with shortening. They turned out great!

A few of my favorite bread recipes are naturally dairy free including my wonderful French bread which I made the other night for dinner. I used millet flour in place of sorghum and loved the bread even more than before. How I wish I had taken a picture of it. It rose so nicely, and my husband said, “This is just like regular bread.” Here’s a picture of the bread made with sorghum:

I also like making that recipe as French bread rolls, but with more whole grain and less starch. This version uses sorghum and millet.

Then there’s my favorite focaccia bread and hamburger buns recipe that uses olive oil and water.
![hamburberbun_thumb8[1]](https://blogger.googleusercontent.com/img/b/R29vZ2xl/AVvXsEjLWU3VUc9fBfWjQYUda4MKcETt9BK9oUePk4PCosIkWpuRLp6Kqw23Ew21hKSvUkU2MKR3lbR5Rg9eCvNpRGHn8jQOk7atTtsIi5JP4F0_orqTFMdAQ9uDT7-RZXirTBN5XegiDagTaRaN/s1600-h/hamburberbun_thumb8%5B1%5D%5B4%5D.png "hamburberbun_thumb8[1]")
If you haven’t tried these recipes, yet, all of them are favorites in this house. I think you will enjoy them, and there is no need to apologize for the fact that they are gluten free, dairy free, and soy free.
Labels: bread recipes, dairy free, dessert recipes
September 3, 2010
Dairy-Free Coconut Chocolate Ice Cream
 I went dairy free for four weeks in June, then did a challenge. I actually felt better after going back on dairy, so I never had the incentive to go off it again. I continued to use almond milk and restrict how much cheese I ate, but I’ve been enjoying homemade ice cream this summer. However, after speaking with a naturopath last week, I’m back to dairy free again (that’s a separate post).
 It has been a record hot summer here, and I sure do enjoy eating cold ice cream when it’s hot. I know many people have blogged about coconut milk ice cream, but I love this stuff and just have to put in my two cents. I also thought I would give you a recipe that is maybe a little different than others you’ve seen. It’s probably not as healthy, but ice cream is a treat, and this recipe is easy and delicious.
The problem with using many dairy substitutes in ice cream is that they just aren’t creamy enough. They don’t contain enough fat. That’s okay if ice milk is what you want and expect, but sometimes it’s nice to have something that’s creamy. Coconut milk naturally has fat which you will see on top of a can of coconut milk. I have seen coconut milk in cartons which does not have as much fat. I have also heard that there are low fat versions of the canned milk, but I haven’t seen it. I recommend going with full fat for this.
About the Ingredients:
- Coconut milk - It does taste like coconut. There’s no getting around that, and if you don’t like coconut, I’m really sorry.
- Instant pudding – This is the not so healthy part I was referring to earlier. It does make flavoring your ice cream easy. Experiment with different flavors if you like it. Some pudding contains milk ingredients and some might contain gluten, so be sure to check the label. I used Jello-O brand.
- Agave nectar – You can use regular sugar if you like. Agave seems to make a softer ice cream which can help if you have any ice cream left over that you put in the freezer, although this one is still pretty hard. Mine is always soft when it’s first made, as you can see from the picture.
Coconut Chocolate Ice Cream (Gluten-Free & Dairy Free)
- 2 cans (14 oz.) coconut milk (full fat)
- 1 small box instant chocolate pudding
- 1/4 c. agave nectar
Note: I have a 1 1/2 quart ice cream maker. If yours is smaller you may need to cut the recipe in half.
View Printable Recipe
Labels: dessert recipes
July 22, 2010
Layered Chocolate Cake Dessert

This recipe came from my sister-in-law and it has been a favorite of ours. Here are a few reasons it’s one of my favorites:
- It tastes great
- It’s moist
- It’s pretty easy to make
- It feeds a lot of people
- It can be made ahead of time
- It doesn’t matter if your cake turns out great, it’s going to be broken in pieces anyway!
This is not a dairy free recipe, but it could be made that way. I found some dairy free cook and serve pudding at the health food store that could be used with a milk substitute. You would then have to come up with a dairy free whipped topping. The chocolate cake recipe I have linked to is already dairy free.
Gluten-Free Chocolate Cake Dessert
- 1 recipe chocolate cake (any chocolate cake will do)
- 1 small box chocolate pudding
- 1 small box vanilla pudding
- 1 large container whipped topping (Cool Whip)
- 1 – 2 Heath candy bars, chilled
 Break half the cake in pieces and put it in the bottom of a large rectangular dish. You could also make this in a trifle bowl.
 Put half the pudding on top by dropping spoonfuls of it, then spreading it around with the back of the spoon.


Spread about half the Cool Whip on top of the pudding. You might not need to use half the container, but use enough to cover everything well.
 Repeat layers. Chop the candy bars and sprinkle on top the last layer of Cool Whip.
 The dish I use ends up being packed full. Half way through I always think it won’t fit, but I sort of press the pudding down on the cake and amazingly it all fits. The Heath bars on top help to keep the Cool Whip from sticking to plastic wrap or foil that I use to cover the dish. Refrigerate until ready to eat.
To serve, you can just dig into it with a spoon, or cut it and use a spatula to take it out in squares. The second method makes a nicer presentation. Either way you end up with nice moist chocolate cake.
This is a great summer time dessert because it is served cold (you do have to heat your oven to bake the cake though). However, I have served it throughout the year at parties and gatherings. It's always a hit!
View Printable Recipe
For more great recipes (though not necessarily gluten-free) visit Tasty Tuesdays.
Labels: cake, dessert recipes
July 1, 2010
Cucumber Mint Granita

I have mentioned the zucchini I’m getting from my garden, but this week the main produce item is cucumbers. I’m not much of a gardener and have only done it the past couple of years. Last year I planted about six cucumber plants. They were large burpless cucumbers and we had them coming out our ears. So this year I only planted three cucumber plants, and they were the small pickling cucumber variety. I thought that would be just right for us. Well, the plants took off, and I still have cucumbers coming out my ears! Next year I think we will have one cucumber plant. I really need to go for more variety in my garden, but since I’m a beginner, I like having just a few things that I know will do well.
This granita was born out of the need to find some way to use these cucumbers. Of course, I know what your thinking—make pickles! We are really not that fond of pickles. I chose pickling cucumbers because they are small and have nice edible skin. I have thought about making pickles to give as gifts, but then I have to get into canning. For now, I’m giving away cucumbers, eating cucumbers, and making this granita. I originally called it a sorbet because I made it in my new ice cream maker. But in the end, it was more like a granita. I forgot to take pictures when I first made it, and once you freeze what’s left, it definitely becomes a granita. It freezes together pretty solidly and has to be broken up or shaved.
I’ll admit that the kids weren’t too fond of it. They didn’t say it was bad, it was just weird. You have to prepare yourself for that fact that it is not a fruity or creamy dessert. It will taste like cucumbers. However, if you like cucumbers and mint, I think you will enjoy this. If you don’t like mint, you could try substituting another herb such as fresh dill.
Cucumber Mint Granita
- 4 c. peeled, seeded, chopped cucumber
- 1 1/2 tsp. chopped mint leaves
- 1/3 c. sugar (or to taste)
- 1/8 – 1/4 tsp. salt (I used 1/4 but will try less the next time)
If you don’t have an ice cream maker, pour it into a large flat container (a 9 x 13 inch pan works well) and freeze. About every 30 minutes stir and/or scrape the mixture to break it up. You can use a fork to “shave” it.
View Printable Recipe
More Cucumber Ideas
If you are looking for more cucumber recipes, last year I made cucumber lemonade, and this week Shirley posted a cucumber chickpea bruschetta. Do you have any favorite cucumber recipes?
This post is linked to some great food carnivals:
- Slightly Indulgent Tuesdays
- Tasty Tuesday
- Tempt My Tummy Tuesdays
- Delicious Dishes
- Ultimate Recipe Swap
Labels: dessert recipes, fruit desserts, other recipes
June 10, 2010
Rhubarb Coffee Cake

I remember having a couple of rhubarb plants in our back yard when I was growing up. I don’t remember what my mom did with it, but I do remember that I loved to eat it raw. Now I prefer it cooked, but I will occasionally munch on a small piece.
My parents have moved since those days when I ate it raw, but my mom still grows rhubarb in her back yard, and I’m still not sure what she does with it. I don’t grow rhubarb, and so when I went to visit her the other week, I brought home a bunch of it (the above picture is not mine, and I didn’t bring home that much). One thing I did learn from her is that you can freeze rhubarb. Just wash and trim it, then cut it in pieces and freeze it in a container. I have some in the freezer now, but I having tried using any frozen pieces yet.
Many recipes pair rhubarb with strawberries, and a couple of my previous recipes do just that: Strawberry Rhubarb Pie and Strawberry Rhubarb Topping. This recipe just uses rhubarb, though, and a good bit of it. Rhubarb, like most things, gets soft when it is cooked. If you don’t like a bit of mushiness in your cake, then you won’t like this, but we thought it was great. Just keep the pieces of rhubarb cut pretty small, and even cut back the amount if you want.

Gluten-Free Rhubarb Coffee Cake
Preheat oven to 350 degrees- 1/4 c. coconut oil (or other oil, or butter)
- 1/2 c. agave nectar (or use sugar and add a little extra milk)
- 2 large eggs
- 1/2 c. sugar
- 1 tsp. vanilla extract
- 3/4 c. brown rice flour
- 3/4 c. sorghum flour
- 1/2 c. potato starch
- 1 tsp. xanthan gum
- 2 tsp. baking powder
- 1 tsp. baking soda
- 1/2 tsp. salt
- 1/3 – 1/2 c. almond milk (or regular milk)
- 2 c. chopped rhubarb
- 1/2 c. gluten free flour mix (just use whatever flour mix you have on hand)
- 1/2 c. brown sugar
- 3 Tb. butter (or substitute)

Combine the topping ingredients, cutting in the cold butter with a pastry blender or fork. Sprinkle on top of the batter.

Bake at 350 degrees about 45 minutes or until the cake tests done.

This post is linked to Slightly Indulgent Tuesdays.
View Printable Recipe
Labels: breakfast recipes, cake, dessert recipes
May 31, 2010
Lemon Bundt Cake

It’s funny. We’re not big chocolate fans around here. Maybe it’s because I have a house full of guys, but even I can take it or leave it. When I ask the boys what kind of cake they want for their birthday, they never say chocolate. I know. It’s hard to believe when most of the world loves chocolate. Most often they request carrot cake or banana cake. My husband has always been a fan of lemon desserts, and the rest of us enjoy them too. That’s why I decided to try making a bundt cake that was nice and lemony.
I’m partial to bundt cakes. They look nice, and don’t require frosting. You can dust them with powdered sugar or add a simple glaze. I usually go with a glaze, and if I’m not making it for a special occasion, I go light on the glaze. The glaze I put on this cake has a strong lemon flavor which was exactly what I wanted. If you like lemon, I bet you’ll enjoy this cake.
I made the cake dairy free which resulted in a slightly odd texture. We didn’t notice it when eating, but it had a stringy look to it which you can see in the photo below. My family didn’t know when I served it to them that I had made it dairy free. They thought it was great. In fact, it was gone in 24 hours and my youngest was almost begging me to make another one. If you are not dairy free, I’m sure this recipe would work great with dairy ingredients.
Lemon Bundt Cake (Gluten & Dairy Free)

Preheat oven to 325 degrees
- 3/4 c. millet flour
- 3/4 c. potato starch
- 1/2 c. tapioca starch
- 1 tsp. xanthan gum
- 1 1/4 tsp. baking soda
- 3/4 tsp. baking powder
- 1/2 tsp. salt
- 1 1/4 c. sugar
- 1/3 c. vegetable oil
- 2 eggs
- 2 tsp. lemon extract
- zest from one lemon (~2tsp.)
- juice of one lemon (~1/4 c.)
- almond milk, milk substitute, or regular milk (~3/4 c.)
- 1 c. powdered sugar
- 1 1/2 Tb. lemon juice
Combine the first seven ingredients in a small bowl. In the bowl of your mixer, beat the sugar, oil and eggs on medium-high for about one minute. Add the lemon extract and mix. Add the flour mix and liquid alternately beginning and ending with the flour mix. Add about 1/4 at a time and mix on medium speed in between each addition. Stir in the lemon zest.
Pour the batter into a well greased or sprayed bundt pan. Bake at 325 degrees for about 50 minutes or until it tests done. Cool in the pan for 5 - 10 minutes. Make sure the edges of the cake are loose, then turn it onto a rack to finish cooling.
In a bowl, combine the powdered sugar and lemon juice, adding 1 Tb. of the juice to start with, then more until it reaches the right consistency. Spoon over the cooled cake. Serve and enjoy.
For more fabulous food made a little bit healthier, check out Slightly Indulgent Tuesdays.
View Printable Recipe
For more lemon recipes, visit The Happy Housewife.
Labels: cake, dessert recipes
May 24, 2010
Orange-Pineapple Cake
First, I want to say thanks to everyone for your comments and emails about going dairy-free. You have been very encouraging and I appreciate all the product and substitute recommendations.
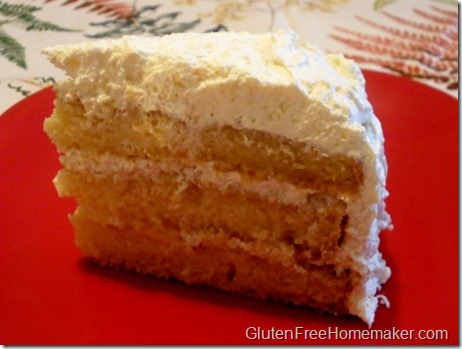
This cake was made before I embarked on my dairy-free journey. The cake itself is actually dairy free, though. It’s the topping that poses a problem. It uses Cool Whip and instant pudding, both of which contain some milk. If any of you have suggestions for a substitute topping, I’d love to hear it. I haven’t given it a lot of thought yet since I’m more concerned about basic eating right now.
This cake was a huge hit at my house. I made it for my son’s 19th birthday (I can’t believe I have a child that old). My second son raved about this cake and said it made the top 5 best cakes. I liked it. I didn’t think it was wonderful, but it was very good. I liked the fruit in it, and the fact that the topping (icing) is light and not a heavy, overly sweet frosting. Because of the fruit and liquid in the cake, it is a heavy cake. It requires baking three layers. I tried this recipe a second time using only two layers and it did not turn out nearly as well. It was too wet to cook though without over cooking some of it. However, if you don’t have three cake pans and really want to try it, I suggest pouring off some of the liquid from the oranges so the batter is not as wet. This is another great recipe adapted from one of my favorite cookbooks.

Preheat oven to 350 degrees.
Cake Ingredients
Combine all the topping ingredients (use the pudding mix dry). If it is too thick, you can add a small amount of pineapple juice. Spread it between the layers and on top of the cake. Keep leftover cake in the refrigerator.
View Printable Recipe
This recipe is submitted to Slightly Indulgent Tuesdays.

This cake was made before I embarked on my dairy-free journey. The cake itself is actually dairy free, though. It’s the topping that poses a problem. It uses Cool Whip and instant pudding, both of which contain some milk. If any of you have suggestions for a substitute topping, I’d love to hear it. I haven’t given it a lot of thought yet since I’m more concerned about basic eating right now.
This cake was a huge hit at my house. I made it for my son’s 19th birthday (I can’t believe I have a child that old). My second son raved about this cake and said it made the top 5 best cakes. I liked it. I didn’t think it was wonderful, but it was very good. I liked the fruit in it, and the fact that the topping (icing) is light and not a heavy, overly sweet frosting. Because of the fruit and liquid in the cake, it is a heavy cake. It requires baking three layers. I tried this recipe a second time using only two layers and it did not turn out nearly as well. It was too wet to cook though without over cooking some of it. However, if you don’t have three cake pans and really want to try it, I suggest pouring off some of the liquid from the oranges so the batter is not as wet. This is another great recipe adapted from one of my favorite cookbooks.
Gluten-Free Orange-Pineapple Cake

Preheat oven to 350 degrees.
Cake Ingredients
- 1 1/2 c. sugar
- 1 c. white rice flour
- 3/4 c. potato starch
- 1/2 c. tapioca starch
- 1 tsp. xanthan gum
- 1 tsp. baking powder
- 1 tsp. baking soda
- 1/2 tsp. salt
- 1 tsp. vanilla extract
- 4 eggs
- 1/2 c. vegetable oil
- 12 oz. mandarin oranges with juice
- 9 oz. Cool Whip, thawed
- 1 pkg (3.5 oz) instant vanilla pudding (check ingredients to be sure it’s gluten free)
- 1 c. crushed pineapple, drained
Combine all the topping ingredients (use the pudding mix dry). If it is too thick, you can add a small amount of pineapple juice. Spread it between the layers and on top of the cake. Keep leftover cake in the refrigerator.
View Printable Recipe
This recipe is submitted to Slightly Indulgent Tuesdays.
Labels: cake, dessert recipes
May 10, 2010
Blueberry Cobbler

Last week I promised to give you a blueberry cobbler recipe, and I won’t keep you waiting any longer. I have to admit that I wasn’t sure it would be very good. I was unsure about the topping ingredients, and it seemed like a lot of bready topping for the amount of fruit. However, once we had it on our plates and started eating it, we found there was plenty of wet blueberry to go with the topping, and it was simply delicious. We loved the whole grain flavor of the sorghum and oats paired with the blueberries. Just thinking about it now makes me want to make another one.
Gluten-Free Blueberry Cobbler
Preheat oven to 375 degrees.- 3 c. frozen blueberries (you could probably use fresh)
- 1/2 c. sugar
- 2 Tb. lemon juice
- 1 tsp. vanilla extract
- 2 Tb. corn starch
- 1/2 c. sorghum flour
- 1/2 c. potato starch
- 3/4 c. gluten-free oats (whirled in a food processor or blender if not instant)
- 4 tsp. baking powder
- 1/2 tsp. salt
- 1/4 c. sugar
- 6 Tb. butter
- 1 c. milk
- 1/4 tsp. cinnamon
- 1 tsp. sugar

Combine the sorghum flour, potato starch, oats, baking powder, salt and sugar in a medium bowl. Use a pastry blender, or your fingers, to cut the butter into the dry mixture until crumbly. Pour in the milk as you stir with a fork, just until moistened. Spoon the topping onto the blueberry mixture in the dish. Sprinkle 1/4 tsp. cinnamon and 1 tsp. sugar over top.

Bake at 375 degrees for 20 – 25 minutes until the topping tests done with a toothpick. Let it cool until warm before serving.

View Printable Recipe
This recipe is linked to Slightly Indulgent Tuesdays. Stop by to find more fabulous food made a little bit healthier.
Labels: dessert recipes, fruit desserts

Subscribe to Posts [Atom]
