September 19, 2008
Making Cloth Napkins
I started by going to the thrift store to see what I could find. I came home with 8-10 napkins which we tried out as soon as I washed them. I soon learned two things: (1)the size was much bigger than we needed for everyday use, and (2) we were going to need a lot more napkins!
One way to help solve both of those problems was to cut the napkins into quarters, thereby reducing the size and increasing the quantity. I also went to the fabric store and bought two yards of flannel in two different patterns. I then made 12 napkins from each yard. Some of the napkins I bought from the thrift store were red, so I also bought a flannel pattern of the same color red which enabled me to use the same thread. I have also decided that red is a great color for napkins since we eat a lot of meals that have at least some tomato in them (Italian, Mexican, hamburgers with ketchup...). I chose the bee pattern because I thought it was cute, but not so cute it would cause my teenage boys to gag. :)
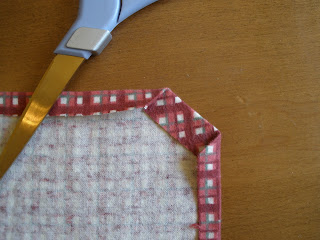
When I first started out sewing the thrift store napkins I was having trouble with the corners. Even though I clipped the fabric, the corners were still thick and one end of the hem would hang out. Then I noticed that the red napkins had different corners and quickly figured a way to do something similar. Here is what I came up with.
First, cut a triangular piece off each corner.
Then fold the cut corner over and press. I don't have exact measurements for this so you have to do it by trial and error, but I quickly figured out about how much to cut and how much to fold.
I then ironed the first fold of the hem, and finally the second fold.
When you iron the second fold, the corner should line up nicely. If you don't have enough room and the two sides are overlapping, redo that first fold where you brought the corner in. Make the fold a little deeper, but not much. If you find you have too much space, make that fold a little more shallow. This is the part you will get the hang of, or maybe you will figure out exact measurements!
You can buy paper napkins pretty cheaply, and it does cost money to make and wash the napkins, but I still think there is some savings in the long run. According to Melissa Breyer, it is definitely greener to use cloth napkins. Here is a post from Frugal Upstate about using cloth vs. paper. I like the idea of using a different napkin ring for each member of the family so that napkins can be saved and reused if they're not too dirty. One of my kids likes using clay. I think I'll have to talk him into making some napkin rings.
As for those dirty napkins, I recently bought a wicker hamper set that included a waste basked and a couple of fabric lined baskets. The waste basket now sits in a corner of the kitchen and we toss the dirty napkins into it. The lined baskets are used to hold the clean napkins.

Labels: frugal tips, homemaking tips
Subscribe to Post Comments [Atom]
<< Home
Subscribe to Comments [Atom]


Post a Comment